Running a WooCommerce store is exciting, but sometimes you need to hit pause. Whether you’re stepping away for a weekend, doing a stock update, or simply setting business hours, your customers need to know what’s going on. That’s where a good store closing message comes in.
Instead of leaving shoppers confused or frustrated when they can’t check out, you can greet them with a clear and friendly store closing message. It helps set expectations, builds trust, and keeps your store looking professional, even when it’s not open for business. Think of it like a virtual “Sorry, we’re closed” sign, but with your brand’s personality baked in.
In this guide, we’ll walk through different ways to add a store closing message to your WooCommerce site. You’ll discover how to use built-in options, add custom code, and Open Close WooCommerce Store plugin to make it all easy and stylish. Plus, we’ll cover how to style the message, where to show it, and how to test it like a pro.
If you’ve ever wondered how to close your store gracefully without confusing your visitors, you’re in the right place. Let’s dive into the smart, simple, and stress-free way to let customers know you’re temporarily offline.
Table of Contents
Why Display a Store Closing Message?
A WooCommerce store closing message is not just a nice-to-have feature—it’s essential for maintaining a smooth shopping experience and earning your customers’ trust. Imagine walking into a brick-and-mortar shop, only to find the lights off and no sign explaining what’s going on. That’s the same kind of confusion your visitors might face when your WooCommerce store is offline or not accepting orders.
Displaying a store closing message solves this problem quickly and professionally. It sets clear expectations and prevents misunderstandings. For instance, if you’re temporarily shutting down for a holiday, stock updates, or even technical maintenance, a simple notice can answer customers’ questions before they even ask.
Here’s why adding a store closing message is so important:
- 🧭 Customer clarity: Instead of wondering why they can’t add items to their cart or check out, your customers instantly understand what’s happening.
- 🛒 Preserve user experience: Even when your store is closed, visitors feel respected and informed, which helps maintain brand loyalty.
- 🗓️ Set reopening expectations: You can let them know exactly when the store will reopen, which encourages them to come back instead of moving on to a competitor.
- 🛠️ Essential during maintenance: If you’re updating your products, fixing bugs, or testing new features, a friendly WooCommerce maintenance mode message helps keep everything professional.
- 🧘♀️ Reduces support requests: A clear message cuts down on customer emails or chats asking why things aren’t working.
Method 1: Using Built-in WooCommerce Notice
If you’re looking for the simplest way to show a WooCommerce store closing message, the built-in Store Notice feature is your go-to option. It’s already available inside WooCommerce settings, and you don’t need any plugins or coding skills to activate it. Whether you’re closing the store for a few hours or a few days, this method helps you notify customers right away.
This built-in tool displays a small banner or message across the bottom (or top) of your site. It’s clean, minimal, and gets the job done with just a few clicks.
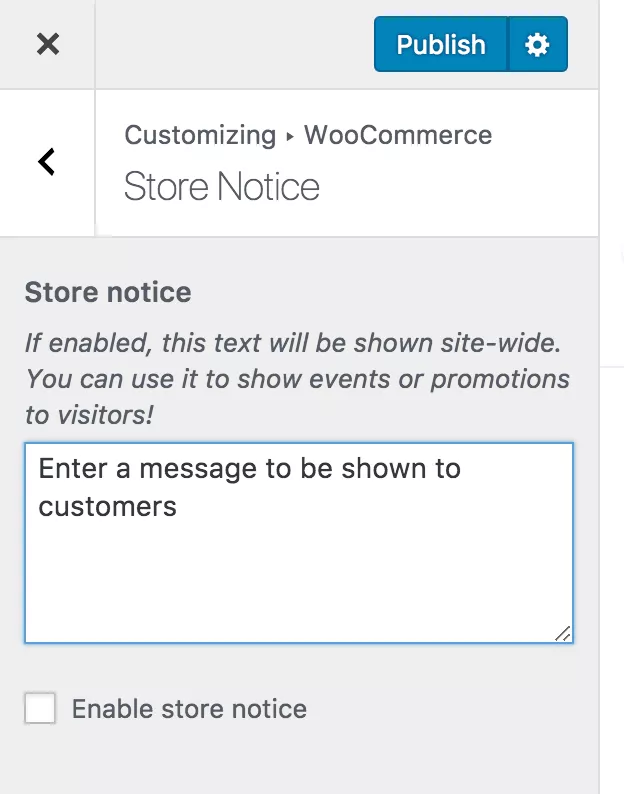
How to Enable the Store Notice:
- Go to your WordPress dashboard
- Navigate to WooCommerce > Settings
- Click the Advanced tab
- Scroll down to Store Notice in the Page Setup section
- Check the box to Enable Store Notice
- Write your closing message (e.g., “We’re currently closed and will reopen on June 15th. Thank you for your patience!”)
- Click Save Changes
The message will now appear site-wide and will remain active until you disable the setting.
Why This Method Works:
- ✅ It’s fast and easy: You can have a store notice live in less than a minute
- ✅ No extra plugins required: WooCommerce has this built in, so it saves resources
- ✅ Good for short-term closures: Ideal if your store is down for just a few hours or a day
- ✅ Visible across your entire site: Ensures every visitor sees the message, no matter which page they land on
Things to Keep in Mind:
- The styling of this message is very basic, and it may not match your branding
- It cannot be scheduled to automatically turn on or off at specific times
- It shows on every page, even ones where you might not want it, like your blog or contact page
Pro Tip:
You can pair this notice with a WooCommerce coupon code or email capture form. For example, tell visitors “We’re closed now, but sign up and get 10% off when we reopen!” This turns a temporary closure into a list-building opportunity.
This method is ideal if you want something quick, easy, and built into the system. But if you need more customization, control, or want to show the message only to certain users, keep reading.
Method 2: Using a Plugin
If you prefer not to deal with code and want a smoother way to manage your WooCommerce store closing message, using a plugin is a smart move. Plugins make it easy to control your store’s availability and display notices, all from a simple dashboard interface. They are especially helpful if you want to automate your store schedule or provide a professional message when your store is closed.
One of the most reliable plugins for this purpose is the Open Close WooCommerce Store plugin. It’s a powerful, easy-to-use solution designed specifically to help WooCommerce store owners set business hours, control purchasing availability, and show a clear message when the store is not open.
Why Use a Plugin Instead of Code?
Using a plugin offers several advantages:
- 📆 Set and forget: Once you configure your store hours, the plugin automatically handles the rest
- 🔐 Safe and beginner-friendly: You don’t need to touch your theme’s code or worry about breaking your site
- 📣 Custom messaging: Display a store closing message that’s clear, professional, and styled to your liking
- 🔧 Built-in features: Plugins often include extra settings for visibility, design, and timing, giving you more flexibility
In short, a plugin takes all the manual effort out of the equation and provides a user-friendly way to manage your store’s opening and closing times.
Open Close WooCommerce Store Plugin: The Best Tool for the Job
The Open Close WooCommerce Store plugin stands out because it does exactly what a store owner needs, without adding unnecessary clutter. It’s built specifically for WooCommerce users who want to show a store closing message and restrict orders outside their preferred business hours.
Here’s why this plugin is the best choice:
- 🕒 Custom store hours: You can set exact opening and closing times for each day of the week. This is ideal for physical stores with operating hours or online shops that need structured availability.
- 📢 Automatic store closing messages: When your store is closed, the plugin shows a customizable notice to let customers know what’s going on.
- 🚫 Block checkout or add to cart: Prevent customers from placing orders when your store is marked as closed. This avoids confusion and improves the overall user experience.
- 🎨 Message customization: You can write your own closing message using plain text or HTML, and position it where it makes sense visually.
- 📍 Page control: Choose whether to show the closing message on product pages, the homepage, checkout, or specific categories.
For Ease of Access, Learn how to Show Frequently Bought Together Products in WooCommerce – Made Easy!
Example Use Case
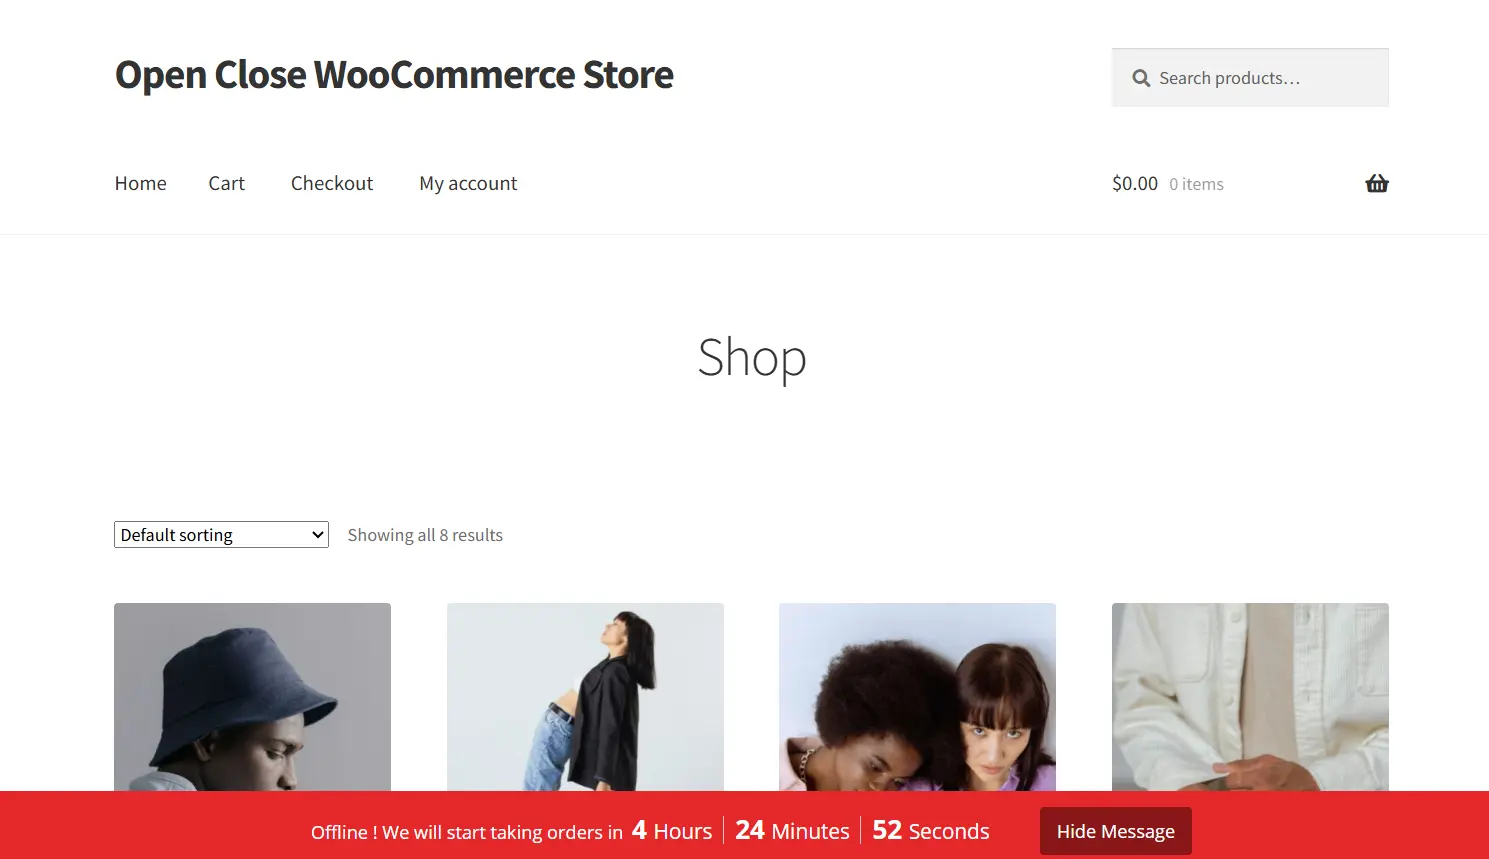
Let’s say your WooCommerce store follows regular business hours, such as 10 AM to 7 PM. With this plugin, you can schedule those hours for each day. Outside of that time, customers will see a banner that reads something like:
“We’re currently closed. Orders can be placed between 10 AM and 7 PM. Thank you for visiting!”
This message appears automatically based on the time and day, so you never have to enable or disable it manually. It gives your visitors clarity and keeps the experience professional even when your store is not available.
How to Display a Store Closing Message in WooCommerce
To show a clear store closing message in your WooCommerce shop, the best and easiest way is by using the Open Close WooCommerce Store plugin. This tool allows you to set up business hours and display a notice when your store is outside those hours.
Step-by-Step Setup
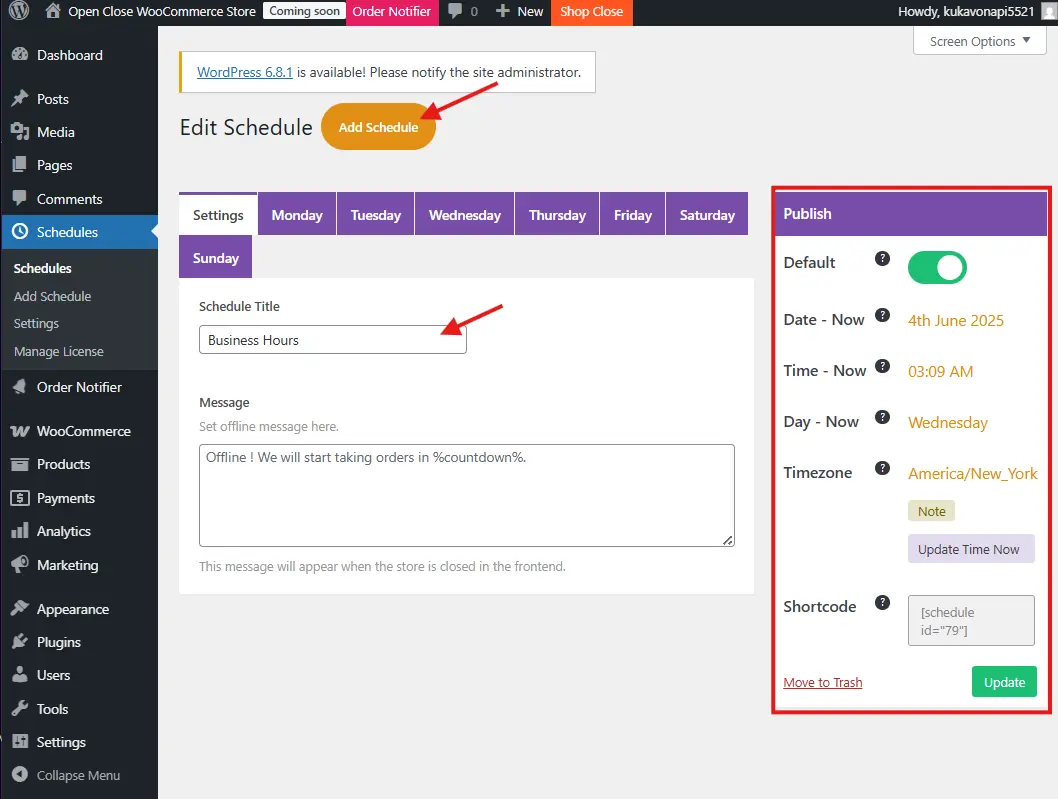
- Open Your Schedule Settings
After installing the plugin, access your active schedule by clicking the orange “Edit Active Schedule” button or go to WooCommerce → Open Close → Schedules. - Set Your Weekly Hours
Select a day and define when your store should be open or closed. For example, you might choose 10 AM to 3 PM on Saturdays. When the store is closed, your custom store closing message will be shown to visitors. - Add Product-Based Availability
Under each day, choose whether all products are available or limit access to specific items during selected times—perfect for flash sales or limited-time offerings. - Create Multiple Time Blocks
Need a lunch break or two different shifts? Add multiple schedules for the same day. Each time range will automatically trigger your store to open or close accordingly. - Control What Happens When Closed
In the settings, choose whether to hide products, disable checkout, or block the cart entirely. This ensures your store closing message is clear and your site behaves just as it should outside business hours.
For full setup visuals and tips, visit the original guide on Tutsflow.
Method 3: With a Custom Code Snippet
If you want more control over how, where, and when your WooCommerce store closing message appears, adding a custom code snippet is the perfect approach. It lets you display a message that blends beautifully with your theme, matches your brand, and shows up only where you want it. Plus, it gives you the freedom to customize every detail, from the text to the styling and even the logic behind when it appears.
This method is especially useful for store owners who want a flexible solution but don’t want to rely on yet another plugin.
How It Works:
You’ll add a small piece of code to your theme’s functions.php file or to a site-specific plugin. This code will output a custom notice across your store’s pages. You can conditionally show or hide it, style it with CSS, or even restrict it to logged-out users only.
Example Code Snippet:
add_action('wp_footer', 'display_store_closing_message');
function display_store_closing_message() {
    if ( !is_user_logged_in() ) {
        echo '<div style="text-align:center; background:#ffe082; padding:12px; font-size:16px; font-weight:bold; color:#333;">
        Our store is currently closed for maintenance. We will reopen on June 15th. Thank you for your understanding!</div>';
    }
}
Step-by-Step Guide:
- Open your WordPress dashboard
- Navigate to Appearance → Theme File Editor
- Select your active theme and open the
functions.phpfile - Scroll to the bottom and paste the code
- Click Update File
- Visit the frontend of your site to see the store closing message in action
Always back up your site before editing theme files. A misplaced comma or missing bracket can break your site. Better yet, use a child theme or a plugin like Code Snippets to safely insert custom code.
Benefits of This Method:
- 🎨 Total design control: You decide the text, colors, layout, and where the message appears
- 🔒 Conditional visibility: Show it only to guests, only on certain pages, or during certain times
- 🧠 Lightweight and plugin-free: Keeps your site fast and clean
- 🧩 Extendable logic: You can even connect it with other conditions like cart total, product category, or user roles
Customize the Code Further:
Want the message only on your homepage? Replace !is_user_logged_in() with is_front_page()
Want to hide it from mobile users? Wrap the div in a mobile detection function
Want to schedule it? Use PHP’s date() function and compare with a timestamp
This approach gives you full control without bloating your site. Once you set it up, it works silently and effectively, helping you deliver a better experience even while the store is paused.
Show Notice on Specific Pages Only
Sometimes, you don’t want to show your store closing message everywhere. For example, just on the homepage or cart page.
Here’s how with custom code:
add_action('wp_footer', 'display_notice_homepage_only');
function display_notice_homepage_only() {
    if ( is_front_page() ) {
        echo '<div style="text-align:center; background:#333; color:#fff; padding:10px;">
        We’re currently closed. Please check back soon!</div>';
    }
}
If using a plugin like Open Close WooCommerce Store, you can limit the notice display to cart, checkout, or product pages using plugin settings.
Also Read How to Hide Related Products for a Specific Category in WooCommerce
Testing Your Closing Message
Before you go live:
- ✅ Open your site in an incognito tab
- ✅ Check desktop and mobile
- ✅ Make sure the message is readable
- ✅ Test during and outside your store hours (if using scheduling plugin)
- ✅ Ensure your checkout is actually disabled if needed
Use tools like BrowserStack to test across different browsers and devices.
Conclusion
A clear WooCommerce store closing message can turn a potentially confusing situation into a well-managed, professional experience. Instead of customers guessing whether your site is broken or if you’re simply closed, they’ll get the exact information they need in a friendly, on-brand message.
Whether you’re using WooCommerce’s built-in features, adding a custom code snippet, or installing a plugin like Open Close WooCommerce Store, adding a store closing message is both smart and simple. It saves time, keeps your visitors informed, and adds a nice touch of polish to your online store operations.
Remember to style your message so it fits your brand, place it where it makes the most sense, and test it across different devices. With just a little effort, your store closing message can be both functional and delightful, showing customers you care even when you’re away.
Catch up with Latest WooCommerce Tutorials and stay in the A Game of the bizz world!