Want to show your business location right on your landing page? Embedding a Full Width Google Map in Unbounce is a fantastic way to build trust, improve local SEO, and help your visitors find you faster. In this updated, beginner-friendly guide, you’ll learn step-by-step how to add a full-width, responsive Google Map in Unbounce—with or without coding.
Let’s dive in!
💡 Bonus Tip: If you’re just getting started with Unbounce or looking to upgrade your plan, don’t miss our exclusive Unbounce coupon deals. Save up to 35% on your subscription and build high-converting landing pages for less!
🌍 Why Add a Google Map in Unbounce?
Before we dive into how to embed it, let’s talk about why adding a Google Map in Unbounce is a smart move for your landing page.
A well-placed Google Map in Unbounce isn’t just about aesthetics, it’s a powerful trust-building and conversion-boosting feature that can benefit almost any kind of website, especially local businesses and service providers.
Here’s what it brings to the table:
✅ Builds Local Trust and Credibility
Showing your physical location instantly makes your business feel more legitimate and transparent. People trust brands they can locate on a map. A Google Map in Unbounce gives your visitors visual proof that you’re real, established, and nearby—especially helpful for first-time customers or clients.
📍 Helps Users Navigate to Your Business Easily
In just one tap, mobile users can open directions directly from your landing page. Whether they’re visiting your restaurant, attending your event, or showing up for a consultation, a Google Map in Unbounce simplifies the journey. It reduces friction and increases the chances of foot traffic or in-person appointments.
📈 Boosts SEO with Local Search Signals
Search engines love clear signals about your business location. Embedding a Google Map in Unbounce helps Google associate your page with your physical address, increasing your visibility in local search results. It can help you show up in “near me” searches and the coveted local 3-pack listings.
✨ Enhances Your Page’s Look and Professionalism
Let’s face it—plain text addresses are boring. A Google Map in Unbounce instantly upgrades your design. It adds a dynamic, interactive element that makes your page feel more modern and functional. Visitors love interactive content, and maps are a great way to deliver that.
Don’t Miss out on 15+ Best Unbounce Landing Page Templates
Method 1: Add a Google Map in Unbounce Using Embed Code (Manual Way)
This method gives you complete control over how your Google Map in Unbounce looks and behaves.
✅ Step 1: Open Your Unbounce Page
- Log into Unbounce and open the landing page where you want the map.
- Switch to the Classic Builder for more customization flexibility.

✅ Step 2: Add a New Full-Width Section
- Drag and drop a new Section onto the page.
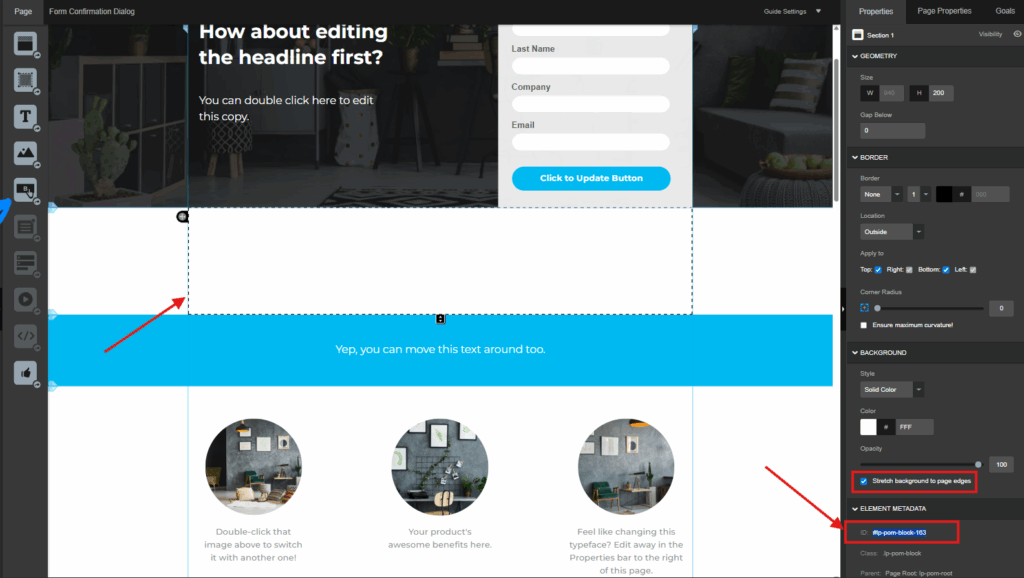
- In the Properties panel, enable “Stretch section to page edges”.
- Note the Section ID (e.g.,
lp-pom-block-163). You’ll use this later.
✅ Step 3: Get the Google Map Embed Code
- Visit Google Maps.
- Search for your location.
- Click Share > Embed a map, then choose the desired map size.
- Copy the iframe code provided.
This iframe will be used to display your Google Map in Unbounce landing page.
✅ Step 4: Add the Embed Code to Your Page
- Open the Javascripts section in the Unbounce editor.
- Paste your map’s iframe code and you can copy the given custom script.
- Adjust width to 100% and height to match your design.
<script>

/*
*  These are custom javascript for this template

*/

/* #### INSTRUCTIONS : #####

|||||| -----> Paste your Google Map Embed Iframe Code with in Quotes ' ' and then change **width** and **height** values to "100%" ||||||||

*/

var mapEmbedURL = '<iframe src="https://www.google.com/maps/embed?pb=!1m18!1m12!1m3!1d3170.3187820732514!2d-122.05119841100665!3d37.382292747021324!2m3!1f0!2f0!3f0!3m2!1i1024!2i768!4f13.1!3m3!1m2!1s0x0%3A0x79af12866bffc69d!2sEl+Mirador+Apartments!5e0!3m2!1sen!2sin!4v1467646844877" width="100%" height="100%" frameborder="0" style="border:0" allowfullscreen></iframe>';

/*Script to Configure Map*/

$( "#lp-pom-block-163 .lp-pom-block-content" ).css('width','100%').append(mapEmbedURL);

</script>
Make sure as per the above class, you can see the id (#lp-pom-block-163), replaces your section id which you can find in the right hand side, properties tray, under element metadata. Now save your web page and publish it.
✅ Step 5: Save, Preview, and Publish
Check the preview to ensure your Google Map in Unbounce displays full-width and is responsive. Then hit publish!
Method 2: Use the Built-In Map App in Smart Builder (No Code)
If you’re using Unbounce Smart Builder, adding a Google Map in Unbounce is even easier.
✅ How to Do It:
- Open Smart Builder and go to the Apps tab.
- Search for Map and install the app.
- Drag the Map component into your layout.
- Enter your location and adjust zoom, style, and appearance.
💡 This is the easiest way to add a Google Map in Unbounce without touching a single line of code.
Making Your Google Map in Unbounce Mobile-Friendly 📱
Mobile users make up a huge part of your traffic. If your map isn’t responsive, you risk confusing or losing potential customers. That’s why it’s important to optimize your Google Map in Unbounce for mobile devices.
Here’s what you can do—without code:
- Use Smart Builder’s Map App: It automatically adjusts to screen sizes, so your Google Map in Unbounce looks great on phones, tablets, and desktops.
- Preview Your Page on Mobile: Unbounce’s preview mode lets you see how your map behaves across different devices.
- Keep It Simple: Avoid cluttering the map section with too many design elements. Clean layout = better performance.
A mobile-optimized Google Map in Unbounce means faster access, less frustration, and happier users.
Track How Visitors Use Your Google Map in Unbounce (No Coding Needed) 🔍
Want to know if your visitors are clicking your map? Tracking interactions with your Google Map in Unbounce can give you valuable insights into user behavior—and the best part is, you don’t need to code it yourself.
Here’s how you can do it easily:
- Use Unbounce’s Google Analytics Integration: Connect GA to your Unbounce account and enable event tracking.
- Set a goal for map interactions: Track actions like “Clicks on Map Section” or time spent on the section.
- Check reports regularly: Use Google Analytics to see how many users interact with your Google Map in Unbounce.
Understanding how your map performs helps you make smarter decisions about layout and design.
Style Your Google Map in Unbounce to Match Your Brand (No Code Needed) 🎨
Your brand has a unique look—why shouldn’t your map reflect it? With a few simple tools, you can customize the appearance of your Google Map in Unbounce without touching any code.
Here’s how to style like a pro:
- Use a visual map widget tool: Platforms like Common Ninja or Elfsight offer user-friendly interfaces to style your maps with colors, icons, and themes.
- Choose a theme that matches your website: Modern, minimalist, vintage—pick one that complements your landing page design.
- Preview before publishing: Always check how the styled map looks live on your page to ensure everything aligns visually.
A well-styled Google Map in Unbounce makes your page look polished, professional, and cohesive with your overall branding.
To keep your design cohesive, use block patterns library from Patternswp that blend seamlessly with your embedded Google Map in Unbounce.
Pro Tips for Embedding a Google Map in Unbounce
Once you’ve embedded your map, you might think the job’s done—but a few smart tweaks can dramatically improve how users interact with your Google Map in Unbounce. These optimization tips will help you deliver a seamless experience that loads fast, looks clean, and keeps visitors focused.
✅ Make It Fully Responsive Across All Devices
Mobile-first isn’t just a trend—it’s essential. Be sure your Google Map in Unbounce stretches beautifully across smartphones, tablets, and desktops. Use full-width layout settings in Unbounce to make sure the map scales naturally without distorting or breaking the design.
Why it matters:
Over 60% of users access websites on mobile devices. A map that isn’t responsive could alienate a big chunk of your audience.
🚀 Optimize for Performance and Load Speed
Maps are visual and interactive, which means they can be heavy on load time if not managed correctly. Avoid placing large images, sliders, or background videos near your Google Map in Unbounce. Every extra element slows things down—and users won’t wait.
Pro tip:
Test your landing page with tools like PageSpeed Insights or GTmetrix to make sure your map section isn’t the bottleneck.
🔕 Eliminate Distractions Near the Map Area
Your map should serve a clear purpose—helping users locate and visit your business. Don’t crowd the section with too many buttons, banners, or flashy animations. Keep it clean and focused.
Especially avoid placing your CTA (call-to-action) button too close to the Google Map in Unbounce. You don’t want users clicking directions when they should be filling out your form or booking a service.
Keep it clean = keep it converting.
SEO Benefits of Using Google Map in Unbounce
When you add a Google Map in Unbounce, you’re not just helping visitors—you’re boosting your visibility in local searches. Google loves it when businesses clearly display their location.
- Use location-relevant keywords in nearby content.
- Mention your business name, city, and zip code.
- Keep your NAP (name, address, phone) info consistent across platforms.
Wrapping Up
Adding a Google Map in Unbounce is one of the smartest, simplest ways to enhance your landing page’s usability, credibility, and local SEO power. Whether you’re running a local storefront, hosting an event, or offering services in a specific area, showcasing your location can make a huge difference in how users engage with your brand.
You now have multiple methods at your fingertips—from embedding a custom map with full-width styling to using Unbounce’s built-in Smart Builder tools or third-party widgets. Even better, you’ve learned how to make your Google Map in Unbounce responsive, fast-loading, and distraction-free—no coding required.
Here’s what to remember:
- A Google Map builds trust and professionalism.
- It helps users navigate to your location with ease.
- It boosts your chances of appearing in local Google search results.
- It adds an interactive, modern touch to any landing page.
So, what are you waiting for? Start embedding your Google Map in Unbounce today and turn your landing page into a location-aware, user-friendly, conversion-optimized experience.
Need help implementing it or customizing the design? Reach out to us at Tutsflow—we’re always here to help your Unbounce pages perform better.