If you want to improve your website’s SEO and visibility in search results, meta tags in WordPress are a game-changer! These behind-the-scenes snippets of code help search engines understand what your page is about, making it easier for potential visitors to find your content. Whether you’re running a blog, an online store, or a business website, properly optimized meta tags can make a huge difference in your organic traffic and click-through rates.
But how exactly do you add meta tags in WordPress? Is it better to use a plugin, or should you edit the code manually? Don’t worry—we’ve got you covered! In this guide, we’ll break down everything you need to know about meta tags, why they’re important, and how you can add them effortlessly to your WordPress site. We’ll explore both plugin-based and manual methods so you can choose the approach that best suits your needs.
By the end of this article, you’ll have a clear understanding of how meta tags in WordPress impact SEO and how to optimize them to drive more traffic to your site.
What Are Meta Tags?
Meta tags are invisible HTML elements embedded within a web page’s code. They provide essential information about a webpage’s content to search engines and sometimes to visitors. You can view meta tags by selecting View Page Source or Inspect Element in your web browser.
Meta tags in WordPress play a crucial role in structuring your website’s metadata. They are snippets of text that help search engines understand your content and how it should be presented in search results. While they are not visible on the actual webpage, they work in the background to enhance your site’s search engine visibility and user engagement.
Common Types of Meta Tags
Several types of meta tags serve different purposes. The most commonly used ones include:
- Meta Description: A brief summary of the webpage’s content. It appears in search engine results and helps users decide whether to click on the link.
- Meta Keywords (deprecated by Google but still used by some search engines): A list of relevant keywords associated with the webpage.
- Meta Robots: Instructions for search engine crawlers on how to index and follow links on the page.
- Meta Charset: Defines the character set used in the document, ensuring proper text encoding.
- Meta Viewport: Helps with mobile responsiveness by defining how a webpage should be displayed on different devices.
Why Are Meta Tags Important?
Meta tags in WordPress significantly contribute to Search Engine Optimization (SEO). When search engine crawlers analyze your website, they extract metadata from meta tags in WordPress along with the actual page content. Well-structured meta tags help search engines rank your pages accurately and improve their visibility in search results.
Additionally, a compelling meta description encourages users to click on your page when it appears in search results, increasing your click-through rate (CTR). The more optimized your meta tags in WordPress are, the better your chances of attracting organic traffic to your website.
How to Add Meta Tags in WordPress
There are two primary methods to add meta tags in WordPress:
- Using a Plugin – Ideal for those who want a user-friendly way to manage meta tags per post or page.
- Manually (Without a Plugin) – Suitable for those who are comfortable with editing theme files.
Method 1: Without a Plugin
Here are the most common and easiest way to add meta tags in WordPress, it can also be done with a plugin. Manually adding the necessary HTML tags to your header.php file is simple, but the tags will not be retained if you change your website’s theme. These meta tags will also apply to the entire website, and will not be unique to each post or page.
Step 1: Open the header.php File
To add meta tags in WordPress without a plugin, you’ll need to open the header.php file. If you are in cPanle (File Manager) simply click on edit file. Or if you are on localhost (offline) can be opened using Notepad++ or any HTML editor.
You can also open header.php file from WordPress admin panel from Appearance > Theme Editor > Select Theme Header (header.php)
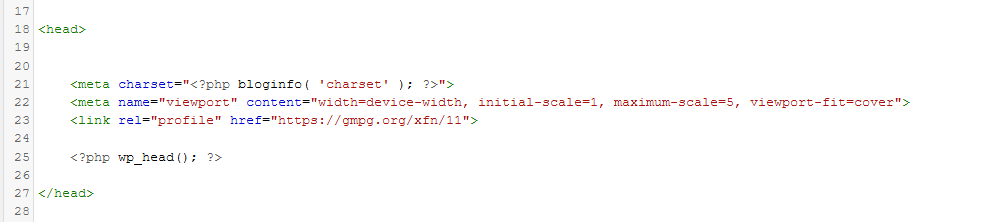
Once you open the file, you’ll need to look for the tag. Your meta data should be placed within those tags.
Step 2: Copy and modify the Meta Tags
Now, copy the generic keyword meta tag below and paste it under the opening tag:
<meta name="keywords" content="keywords related to the content of the website" />Then copy the generic description meta tag below, and paste it under the previous line:
<meta name="description" content="meta description for the content of the website" />After that, you can customize the placeholders and fill in your own keywords and meta description.
Method 2: Using Meta Tag Plugins
There are various plugins that provide the blog administrator to set the keywords, description, and other meta tags to be unique per post. Using Meta Tag Plugins lets you customize and add meta tags in WordPress, and pick the ones you want to add, or not, on a per-post basis. This provides your meta information to completely represent each page.
In the coming step, we’ll learn how you could insert meta tags by using third-party plugins.
If you want an easy, powerful, and user-friendly way to add and manage meta tags on your WordPress site without touching any code, the Rank Math SEO plugin is an excellent choice. It’s a popular SEO plugin that helps you optimize your meta titles, descriptions, and other important meta tags quickly.
Why Use Rank Math?
- Easy setup with a step-by-step wizard
- Built-in snippet preview to see how your meta tags appear on Google
- Supports custom meta tags per post, page, or taxonomy
- Automatically generates meta tags for homepage, archives, and more
- Lightweight and fast — won’t slow down your website
Step 1: Install and Activate Rank Math
- From your WordPress dashboard, go to Plugins > Add New.
- Search for “Rank Math SEO.”
- Click Install Now and then Activate once the plugin is installed.
Check out our Guide to Install WordPress Plugins
Step 2: Complete the Setup Wizard
After activation, Rank Math will launch a setup wizard that guides you through basic configuration:
- Connect your Rank Math account (free)
- Configure your site type (blog, business, portfolio, etc.)
- Set up your webmaster tools verification if needed
- Choose your preferred SEO settings
You can skip or adjust any step and change settings later in the plugin dashboard.
Step 3: Add Meta Tags to Your Homepage and Site-wide
To set meta tags that apply across your entire site or homepage:
- Go to Rank Math > Titles & Meta from the WordPress dashboard.
- Click the Homepage tab.
- Enter your SEO Title and Meta Description for the homepage.
Use keywords naturally, write a compelling description, and keep the length between 150-160 characters. - You can also customize meta tags for other sections like posts, pages, categories, and archives from the other tabs.

Step 4: Add Meta Tags to Individual Posts or Pages
- Open any post or page in the WordPress editor.
- Scroll down to the Rank Math SEO meta box below the content editor.
- Click on the Edit Snippet button.
- Fill in the SEO Title and Meta Description fields.
- Use the snippet preview to see how your page will look in Google search results.
- When done, update or publish the post.

Step 5: Control Robots Meta Tags (Optional)
Rank Math also lets you customize the robots meta tag for any page or post:
- In the Rank Math meta box, switch to the Advanced tab.
- Under Robots Meta, choose whether to:
- Index or noindex the page
- Follow or nofollow links on the page
- This gives you full control over how search engines crawl and index your content.
Bonus: Adding Custom Meta Tags
If you want to add custom meta tags beyond what Rank Math offers in its interface:
- Go to Rank Math > General Settings > Edit Robots.txt or use a plugin for header/footer scripts.
- Or add custom code snippets in your child theme’s
functions.php(advanced users).
But for most users, Rank Math’s built-in options will cover all essential meta tags.
✅ Best Practices for Writing Meta Tags
Writing effective meta tags is part art, part science. While they may be short in length, the impact of a well-written meta tag on SEO and user engagement is significant. Here’s a deeper dive into some best practices to follow when crafting meta tags for your WordPress site:
1. Be Concise but Informative
Keep your meta descriptions between 150 to 160 characters. This is the typical length that search engines like Google display in search results. If your description is too long, it might get cut off with an ellipsis (…), which can reduce clarity and click-through rates. Aim to summarize the page content in a compelling, easy-to-read sentence that encourages clicks.
2. Use Primary Keywords Naturally
Including your main keyword in your meta title and meta description helps search engines understand the topic of your content. But keyword usage should always feel natural. Keyword stuffing (cramming multiple keywords unnaturally) can look spammy and hurt your SEO. Focus on writing for humans first, search engines second.
Example:
Bad: “SEO, SEO tips, SEO WordPress, SEO best guide, SEO basics.”
Good: “Learn easy and effective SEO tips to improve your WordPress site’s visibility.”
3. Avoid Duplicate Meta Tags
Each page on your website should have unique meta tags. Duplicate meta descriptions across multiple pages confuse search engines and reduce the chance of ranking effectively. If you’re using a plugin like Yoast SEO, it will alert you to duplicates so you can fix them easily.
4. Skip the Meta Keywords Tag
While once important, meta keywords are now mostly ignored by search engines like Google and Bing. In fact, using them can sometimes signal outdated SEO practices. Focus instead on creating rich, keyword-aligned content within your titles and descriptions.
5. Control Crawling with Meta Robots Tags
Use the meta name="robots" tag to tell search engines how to handle your page. The default is usually “index, follow,” which allows bots to index the page and follow its links. But there are situations (like a thank-you page or duplicate content) where you might want to use:
noindex, follow– Don’t index the page, but follow its linksnoindex, nofollow– Don’t index the page or follow linksindex, nofollow– Index the page but don’t follow its links
Understanding how to use robots meta tags gives you more control over what gets shown in search engines and what stays hidden.
How to Check Your Meta Tags?
After adding meta tags to your WordPress site, it’s essential to confirm they’ve been implemented correctly. Here are a few easy ways to check and verify your meta tags:
1. Inspecting Your Site’s Source Code
This method allows you to see your meta tags directly in the HTML of your page:
- Open your website in any browser (Chrome, Firefox, Edge, etc.)
- Right-click anywhere on the page and select “View Page Source”
- Press Ctrl+F or Cmd+F and type “meta” to quickly locate meta tags
- Check for tags like
<meta name="description" content="...">or<meta name="robots" content="index, follow">
Alternatively, use your browser’s Developer Tools (F12 or right-click → Inspect) to check the <head> section and make sure your tags are visible and properly formatted.
2. Use Online SEO Tools for Validation
If manually inspecting your source code sounds a bit too technical, no worries. Several free and paid tools let you analyze your meta tags with just a URL.
- Google Rich Results Test: Tests your page for structured data but also shows meta info like the title and description as seen by Google.
- Ahrefs Site Audit: Identifies missing or duplicate meta tags, long descriptions, and SEO errors.
- Screaming Frog SEO Spider: A desktop tool that scans your website and lists all meta tags with detailed insights.
- Yoast SEO Analyzer: If you’re using Yoast, it provides on-page SEO suggestions including issues with meta tags.
These tools are especially helpful if you manage a large website and want to audit multiple pages at once.
Conclusion
SAnd there you have it—everything you need to know about adding meta tags in WordPress! Whether you decide to go the plugin route with a powerful tool like Yoast SEO or prefer to get hands-on by manually editing your theme files, both methods will help boost your website’s visibility in search engine results. The right meta tags can significantly impact your SEO, making your content more discoverable and encouraging more visitors to click through to your site.
Remember, well-optimized meta tags in WordPress do more than just help search engines—they also improve the user experience by giving potential visitors a quick preview of your content before they even land on your page. Taking the time to craft compelling meta descriptions and relevant keywords can ultimately drive higher engagement and conversions. If you like our article share your experience with us, & don’t forget to follow us on Facebook & Twitter