Adding a watermark to your Excel files can be a great way to convey important information or brand your documents without distracting from the content. Watermarks serve multiple purposes: they can denote the status of the document, such as “Draft” or “Confidential,” or include branding elements like a company logo. Regardless of the purpose, incorporating a watermark into your Excel files can enhance the professionalism and security of your work.
In business settings, documents often require an additional layer of security or branding. Watermarks provide a subtle yet effective method to ensure your files are handled appropriately. For instance, adding a “Confidential” watermark can prevent unauthorized sharing, while a company logo can reinforce brand identity. Understanding how to efficiently add and customize watermarks in Excel can be a valuable skill for maintaining the integrity and appearance of your documents.
This guide is designed to help you seamlessly add watermarks to your Excel files. We’ll cover the step-by-step process, from inserting the watermark to adjusting its appearance for optimal impact. By the end of this guide, you’ll be able to create polished, professional Excel documents that communicate your intended message with clarity and style. Let’s get started on elevating your Excel skills to the next level!
How To Add Watermark in Excel Sheet?
So now, kindly open your Excel sheet and follow the below steps to add a watermark Excel sheet,
Step 1 – Take a blank workbook to add and create your watermark.

Step 2 – Then, click on the Insert tab, next keep the WordArt option from the below column And pick as you want.

Step 3 – Pick on the colour words which you need, then It will bring the one text box with the same which you decide, after writing the text that you need to do for creating the watermark in sheet, like a Tutsflow!

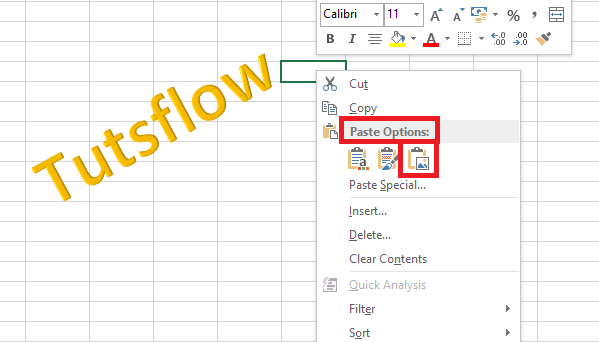
Step 4 – Then, your watermark image is available, and you can resize and rotate it to make it seem good and attractive. Now, Click the right button and copy the image which you have written.

Step 5 – Paste the image on the word as the picture, and you can simply resize also rotate the image in word. Then, Right-click on the image and save it as the picture on your computer.

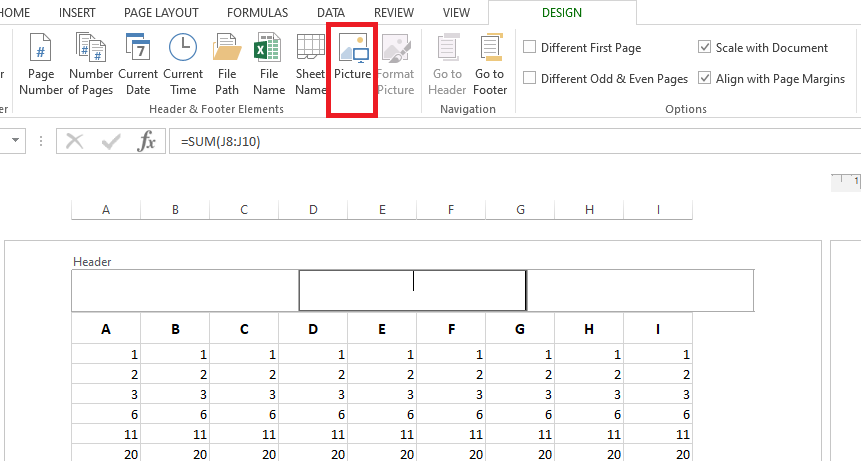
Step 6 – Now, again go to Insert tab and select the option to add header and footer option in excel sheet.

Step 7 – At that time, you click on header and footer, it allows the excel sheet in another format like in the screenshot,

Step 8 – Then, click on the picture to add the image to your excel sheet.

Step 9- Now, Insert the image and you will be ready to look the image as watermark in excel file.

Conclusion
Adding a watermark to your Excel files is a simple yet effective way to enhance the professionalism and security of your documents. By following the steps outlined in this guide, you can easily insert and customize watermarks to suit your needs. Whether you’re marking a document as confidential or adding a touch of branding, watermarks can help convey your message clearly and effectively. With these skills in your toolkit, your Excel files will stand out with added visual appeal and importance. Happy watermarking!

