Imagine having multiple online stores that all speak to different audiences, sell different products, or serve different regions, yet you can manage them all from a single dashboard. That’s the beauty of a WooCommerce multisite setup. If you’re tired of logging into different WordPress dashboards for every store or struggling to keep your plugin versions in sync, it’s time to simplify your life.
WooCommerce multisite allows you to build an entire ecosystem of WooCommerce stores, all neatly stacked under one WordPress umbrella.
And the best part? You’re not locked into a one-size-fits-all solution. Each store in your network can have its own theme, product catalog, checkout process, and even domain. With WooCommerce multisite, you’re not just managing stores, you’re running a full-fledged eCommerce empire!
In this guide, we’ll walk you through what WooCommerce multisite is, how it works, and how to set it up the right way. We’ll also cover everything from product management to syncing inventory, so you’re ready to launch and scale like a pro.
Table of Contents
What is WordPress Multisite?
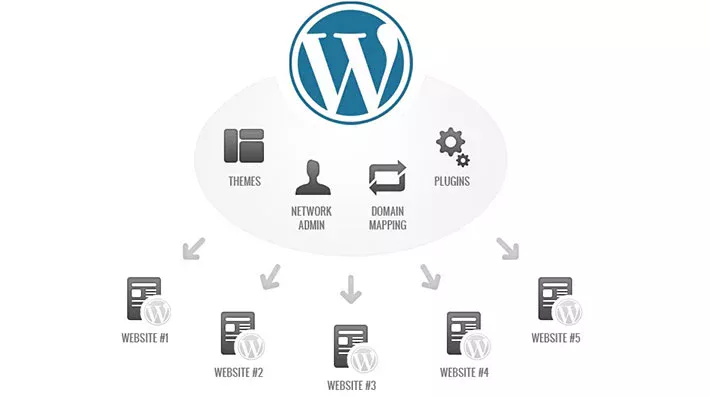
WordPress Multisite lets you run multiple websites from a single WordPress installation. Instead of setting up WordPress over and over, you do it once and then create as many sites as you want inside the same network.
Now add WooCommerce to the mix, and things get exciting.
Each site in your network becomes its own online store. One could sell clothing, another could focus on handmade soap, and a third could be your next big digital course platform. All of them live under one dashboard.
This is exactly what a WooCommerce multisite setup is made for.
You get the freedom to:
- Build separate stores for different regions or brands
- Use unique themes and plugins per store
- Keep everything managed from a central place
Think of it like running a chain of shops in the same mall. Each has its own entrance and products, but you hold the master key.
A WooCommerce multisite setup is perfect for anyone who wants scale and flexibility without the mess of managing dozens of separate WordPress sites.
Why Use WooCommerce on Multisite?
So why go through the trouble of setting up a WooCommerce multisite network? Let’s be real. Managing multiple WooCommerce stores individually can be a pain. You’re logging into different dashboards, repeating updates, and basically running from one digital fire to the next. But with WooCommerce on multisite, you can breathe easier.
Here’s why people love it:
1. Central Control
One login. One dashboard. Endless possibilities. You can access every store from one place. This saves time and keeps your workflow clean.
2. Different Stores for Different Purposes
Have separate brands? Selling in multiple countries? Want one store in English and another in Spanish? A WooCommerce multisite lets you run unique stores while staying under the same WordPress roof, maximize sales on each storefront using WooCommerce affiliate plugins

3. Faster Scaling
Adding a new store is as easy as creating a new site in the network. You don’t have to install WordPress all over again or start from scratch. This makes growth super smooth.
4. Customized Experience per Store
Each store can have its own theme, product catalog, tax settings, payment gateways, and customer experience. Your yoga gear store and your tech gadget store can live in the same network but still feel completely different to your shoppers. You can add custom CSS for each store to ensure consistent brand styling
5. Cost-Effective
Because everything runs on one WordPress installation, hosting costs stay lower. Plus, updates and maintenance take less time. Each subsite can have its own settings for taxes in WooCommerce.
Running multiple WooCommerce stores doesn’t have to feel like herding cats. A WooCommerce multisite setup helps you stay organized, efficient, and in control of your eCommerce empire.
1️⃣ Prerequisites and Hosting Requirements
Before you jump into building your own WooCommerce multisite network, it’s important to get your foundation right. Multisite is powerful, but it also demands a bit more from your hosting environment and setup.
Let’s make sure you have everything you need before flipping the switch.
✅ A Reliable Hosting Environment
A regular shared hosting plan might not cut it. You’re going to be running multiple WooCommerce stores, each with its own plugins, themes, and traffic. That’s why you should go for:
- VPS Hosting: Gives you more control and resources
- Cloud Hosting: Scales well as you grow
- Managed WordPress Hosting: Easier setup, better performance, and built-in security
Look for a host that officially supports WordPress Multisite. Some even offer 1-click multisite installs. Choose a host optimized to speed up your WooCommerce store and handle multisite traffic efficiently
✅ SSL Certificates
If your WooCommerce multisite network will include different domains or subdomains, each one needs its own SSL certificate. Luckily, services like Let’s Encrypt make this easy and free. Your customers should always see that padlock in the address bar.
✅ Domain Mapping Support
Will you be using subdomains like store1.example.com or full domains like store1.com? If you’re going with separate domains, you’ll need domain mapping. Some managed WordPress hosts offer this by default, or you can use a plugin like Mercator to do it manually.
✅ A Clean WordPress Installation
While you can enable multisite on an existing site, it’s best to start fresh if you can. That way, you won’t run into theme or plugin conflicts down the road.
✅ Backup and Restore Tools
Never skip this. Once your WooCommerce multisite network is live, you’ll want a way to back everything up regularly. Especially if you’ve faced issues like WordPress not sending emails, which could be tied to plugin or hosting misconfigurations. Tools like UpdraftPlus Premium, BlogVault, or Jetpack Backup are all great options that support multisite setups.
Quick Recap:
| Requirement | Recommended Option |
|---|---|
| Hosting | VPS, Cloud, or Managed WordPress Hosting |
| SSL | One per domain or subdomain |
| Domain Mapping | Plugin or host-level support |
| Backup Tools | BlogVault, UpdraftPlus, Jetpack Backup |
| Multisite-Compatible Plugins | Always check before installing |
Getting these essentials in place ensures your WooCommerce multisite runs smoothly from day one. Don’t skip this step. It’s the bedrock of everything that comes next.
2️⃣ Enable WordPress Multisite
Now that your hosting and setup are ready, it’s time to activate WordPress Multisite. This is the first big step toward building your WooCommerce multisite network.
Don’t worry. It’s easier than it sounds. You only need to edit a couple of files and follow the instructions from WordPress itself.
Let’s take it one step at a time.
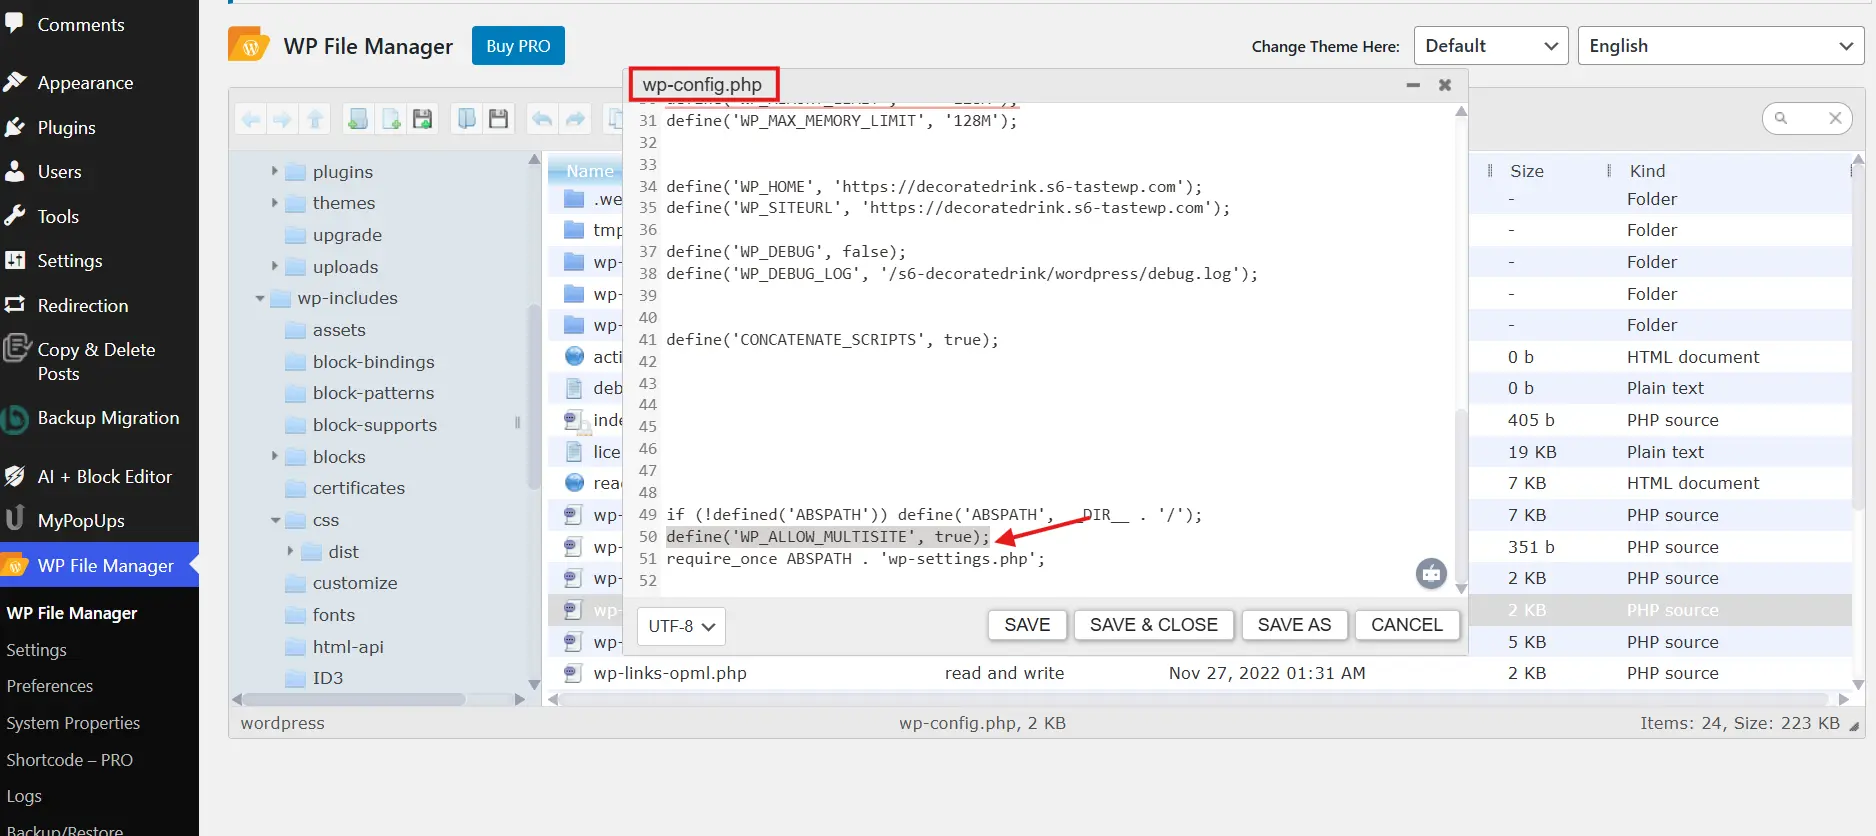
Step 1: Open Your wp-config.php File
You’ll find this file in the root folder of your WordPress site. You can access it via:
- Your hosting control panel’s File Manager
- An FTP client like FileZilla
Once you locate the file, open it in a text editor.
Step 2: Add the Multisite Activation Code
Right before the line that says/* That's all, stop editing! Happy publishing. */
add this line:
define('WP_ALLOW_MULTISITE', true);Save the file.
This step tells WordPress to unlock the multisite feature.
Step 3: Go to the Network Setup Screen
- Log in to your WordPress admin dashboard.
- Go to Tools > Network Setup.
Here, WordPress will ask you to choose one of two formats for your network:
Option 1: Subdomains
Your sites will look like store1.example.com, store2.example.com, and so on.
Option 2: Subdirectories
Your sites will look like example.com/store1, example.com/store2, and so on.
Note: If your site is older than a month, subdirectory setup might be blocked by default. In that case, go with subdomains.
Pick the format that fits your needs best.
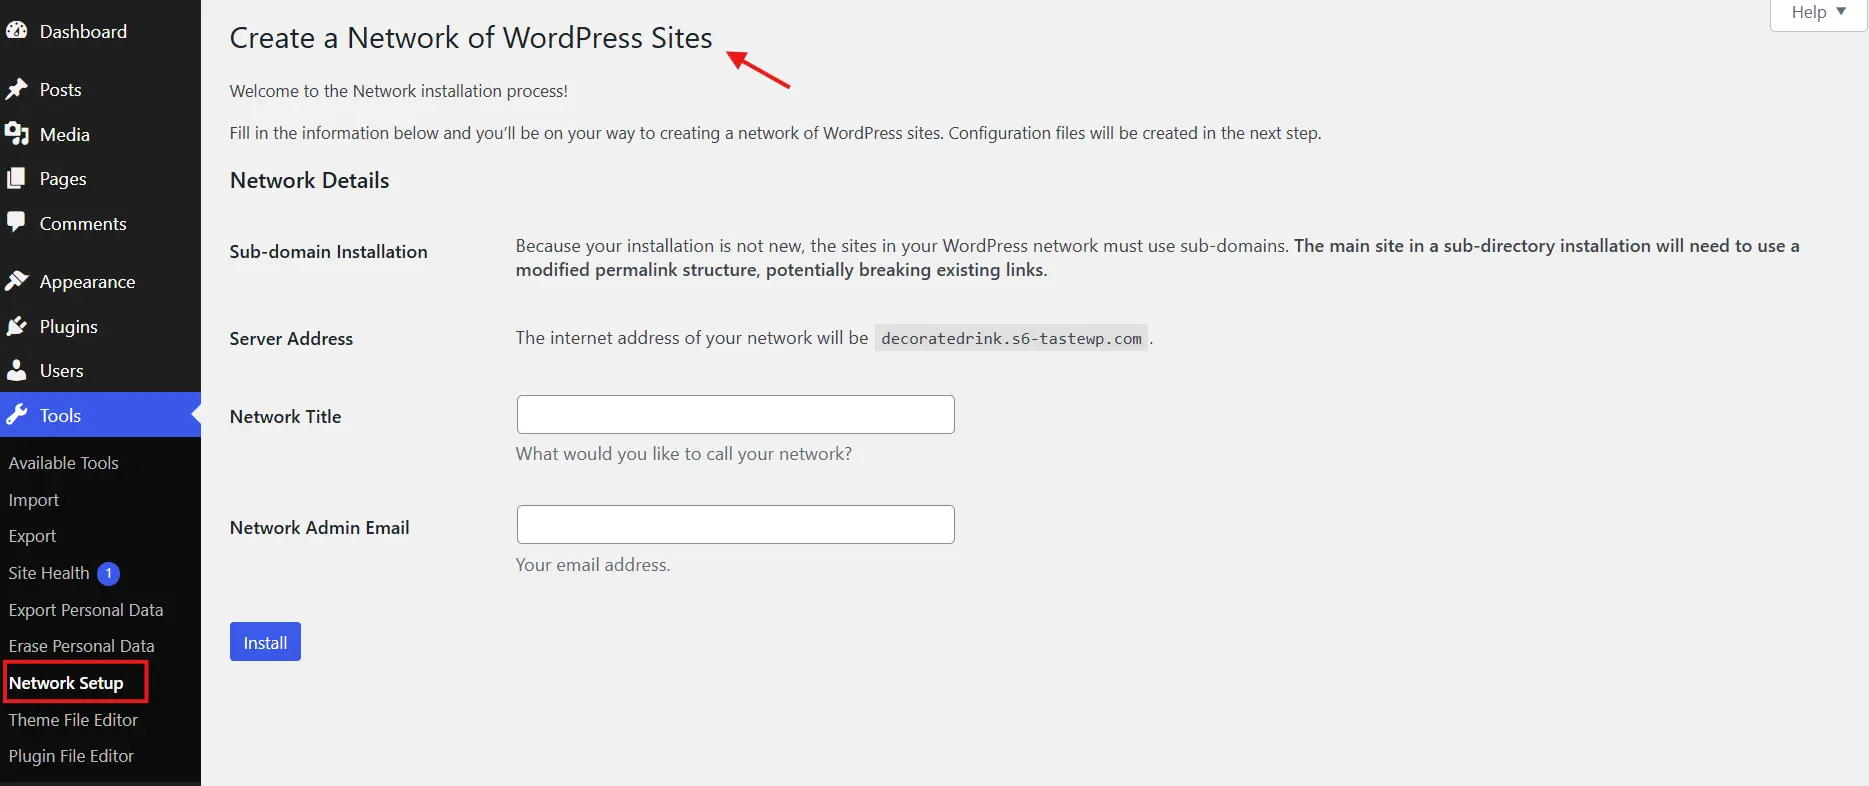
Then, give your network a name (like “My Store Network”) and enter the network admin email address.
Click Install to continue.
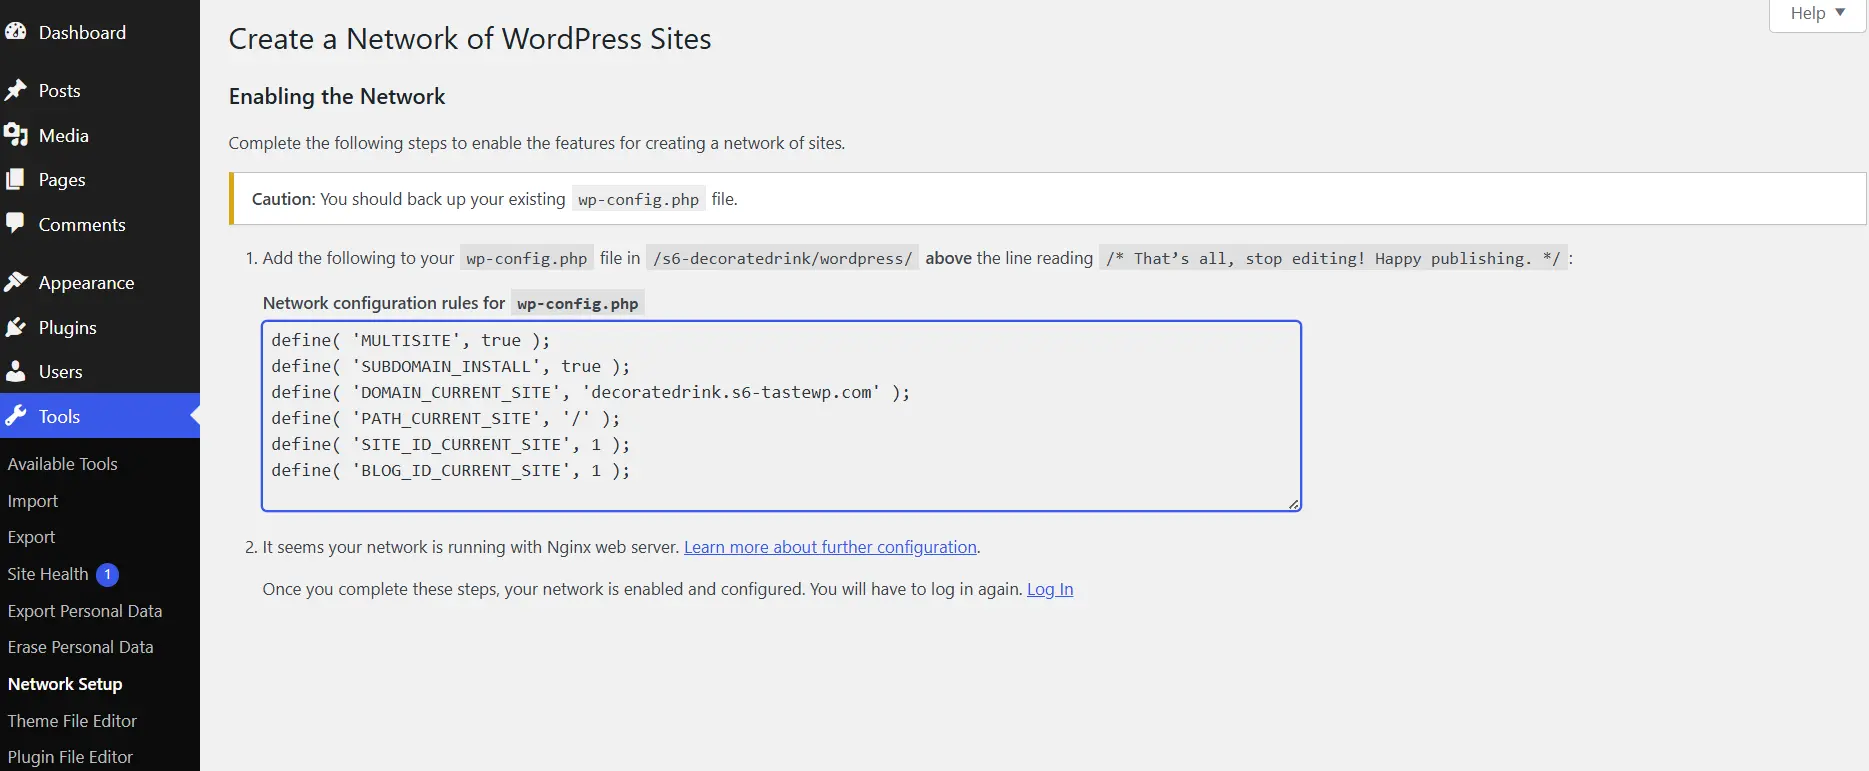
Step 4: Follow the Code Instructions
After clicking Install, WordPress will give you two blocks of code:
- One to add to your
wp-config.php - One to add to your
.htaccessfile
Copy and paste the code exactly as shown into the respective files. Replace the existing .htaccess rules with the new ones.
Save both files when done.
Step 5: Log Back Into WordPress
You’ll be logged out after saving the files. Just log back in using your usual credentials.
Now, you’ll see a new item at the top-left corner of your dashboard menu: My Sites. This is where you’ll manage your entire WooCommerce multisite network.
What Just Happened?
You’ve officially turned your single WordPress site into a multisite network. You now have the power to add new stores, manage them from one place, and begin your multisite eCommerce journey.
Pretty cool, right?
Up next, we’ll install WooCommerce on each site to start turning them into fully functional stores.
3️⃣ Install WooCommerce on Each Site
Once your network is active, it’s time to install WooCommerce. For in detail guide, hop on to the WordPress plugin installation guide:
Option 1: Network Activate
This installs WooCommerce on all subsites at once. However, each store still manages its own products, customers, and orders.
Option 2: Install Per Site
If you want WooCommerce only on certain subsites, go to My Sites > Network Admin > Sites, select the store, and install WooCommerce just for that site.
No matter which method you choose, every WooCommerce store will be independent within the network.
Optional Tip: Use a Plugin to Speed Things Up
If you’ll be managing many stores, consider using a multisite-compatible plugin like WP Ultimo or Multisite Plugin Manager. These tools help you bulk-install or manage plugins across multiple subsites, saving loads of time.
Once WooCommerce is installed on each site, you’re officially running a multisite WooCommerce empire. Each site is ready to start listing products, taking orders, and serving customers.
4️⃣ Managing Products Across Sites
Each site manages its own product inventory by default. That means you can have completely different catalogs on different subsites. Great for brand-specific or region-specific products.
Want to Sync Products Across Sites?
You’ll need third-party plugins like:
- Multisite Product Sync by Codeixer
- WooMultistore by 61extensions
These plugins help you sync products, stock quantities, or categories between your Woocommerce multisite stores.
5️⃣ User Roles and Permissions
By default, each site has its own users, which helps maintain store independence. But if you’re running a team or need cross-site management, you can give users access to multiple stores.
Tools You Can Use:
- User Role Editor: Customize capabilities for each role.
- Multisite User Management: Add users to multiple sites quickly.
This makes managing customer service, fulfillment, or marketing teams across your WooCommerce subsite network way more organized. You can customize login pages for each subsite to reflect individual brand identities
6️⃣ Syncing Inventory or Orders
Need centralized inventory management? You’ll have to go beyond WooCommerce’s default tools. Use WordPress automation plugins like Uncanny Automator to link tasks across your WooCommerce multisite.
Recommended Solutions:
- WooMultistore lets you sync orders, products, and stock across subsites.
- Uncanny Automator or Zapier can automate order workflows between stores.
- WP All Import / Export for bulk data management across stores.
While WordPress Multisite doesn’t offer native order syncing, these tools bridge the gap and bring order to your WooCommerce multisite setup.
Conclusion
Running multiple online stores doesn’t have to be overwhelming. With a proper WooCommerce multisite setup, you can manage everything from one place, save time, and scale your business with confidence.
Whether you’re creating region-specific shops, launching new product lines, or building a client network of WooCommerce stores, multisite gives you the flexibility to grow fast without juggling a dozen WordPress installs.
Just remember:
- Start with solid hosting that supports multisite
- Enable the network the right way
- Install WooCommerce on each subsite
- Choose whether each store runs independently or with shared tools
From product management to user roles and custom domains, a WooCommerce multisite setup opens the door to powerful possibilities for agencies, entrepreneurs, and global businesses alike.
So go ahead and build your eCommerce empire one store at a time, all under one WordPress roof.