Running an online store is exciting, but let’s be honest, taxes? Not so much. The good news? Setting up taxes in WooCommerce doesn’t have to be a headache! With WooCommerce’s flexible tax configuration options, you can ensure compliance with regional tax laws while keeping the shopping experience smooth for your customers.
Whether you are selling locally or internationally, getting your tax settings right is crucial. No one likes surprise fees at checkout, and incorrect tax calculations can lead to compliance issues. That’s why setting up taxes in WooCommerce properly can save you from legal troubles and keep your business running without hiccups. From defining tax rates to handling exemptions and automating calculations, WooCommerce makes tax management a breeze, but only if you know how to do it right!
Table of Contents
This guide is here to help you navigate the world of e-commerce taxes with ease. We’ll walk you through setting up taxes in WooCommerce step by step, so you can focus on what matters—growing your business and keeping customers happy. So, let’s dive in and make tax management a hassle-free part of your WooCommerce journey!
Why Setting Up Taxes in WooCommerce Is Crucial?
If you’re running an online store, setting up taxes in WooCommerce correctly is non-negotiable! Getting it right ensures smooth operations, legal compliance, and customer trust. Here’s why setting up taxes in WooCommerce should be at the top of your priority list:

- Stay Legally Compliant – Tax laws vary across regions, and failing to comply can lead to hefty fines or legal trouble. Setting up taxes in WooCommerce correctly helps you meet all regional requirements and keeps your business safe from penalties.
- Build Customer Trust – Transparent and accurate tax calculations show professionalism and reliability. Customers appreciate clear pricing and knowing exactly what they’re paying for. Setting up taxes in WooCommerce properly makes transactions seamless and boosts your store’s credibility.
- Ensure Financial Accuracy – Keeping your books in order is essential for long-term success. Proper tax settings mean precise accounting, better financial tracking, and no end-of-year surprises. Setting up taxes in WooCommerce the right way allows for stress-free financial reporting.
The bottom line? Setting up WooCommerce taxes isn’t just a technical task, it’s a fundamental part of running a successful store. By ensuring compliance, building trust, and maintaining accurate financial records, you set your business up for long-term growth and success.
How to Set up Taxes in Woocommerce?
Setting up taxes in your WooCommerce store isn’t just a box to check—it’s key to staying on the right side of the law and keeping your finances in order. Get it right, and you’ll avoid headaches down the road!
This guide will walk you through the process of configuring tax settings in WooCommerce, enabling you to manage taxes effectively for your online business.
Step 1: Enable Taxes in WooCommerce
By default, WooCommerce does not enable tax calculations. To activate tax settings:
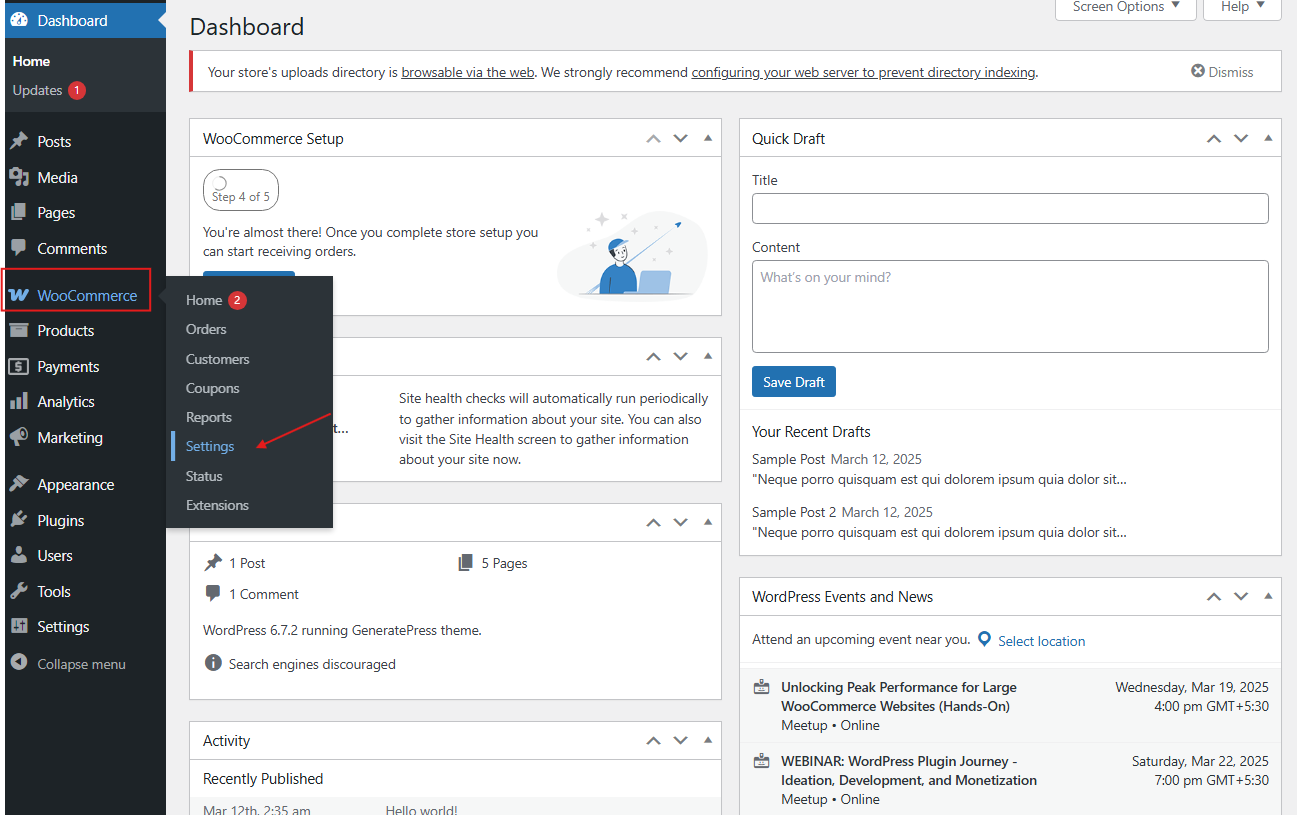
- Navigate to your WordPress dashboard.
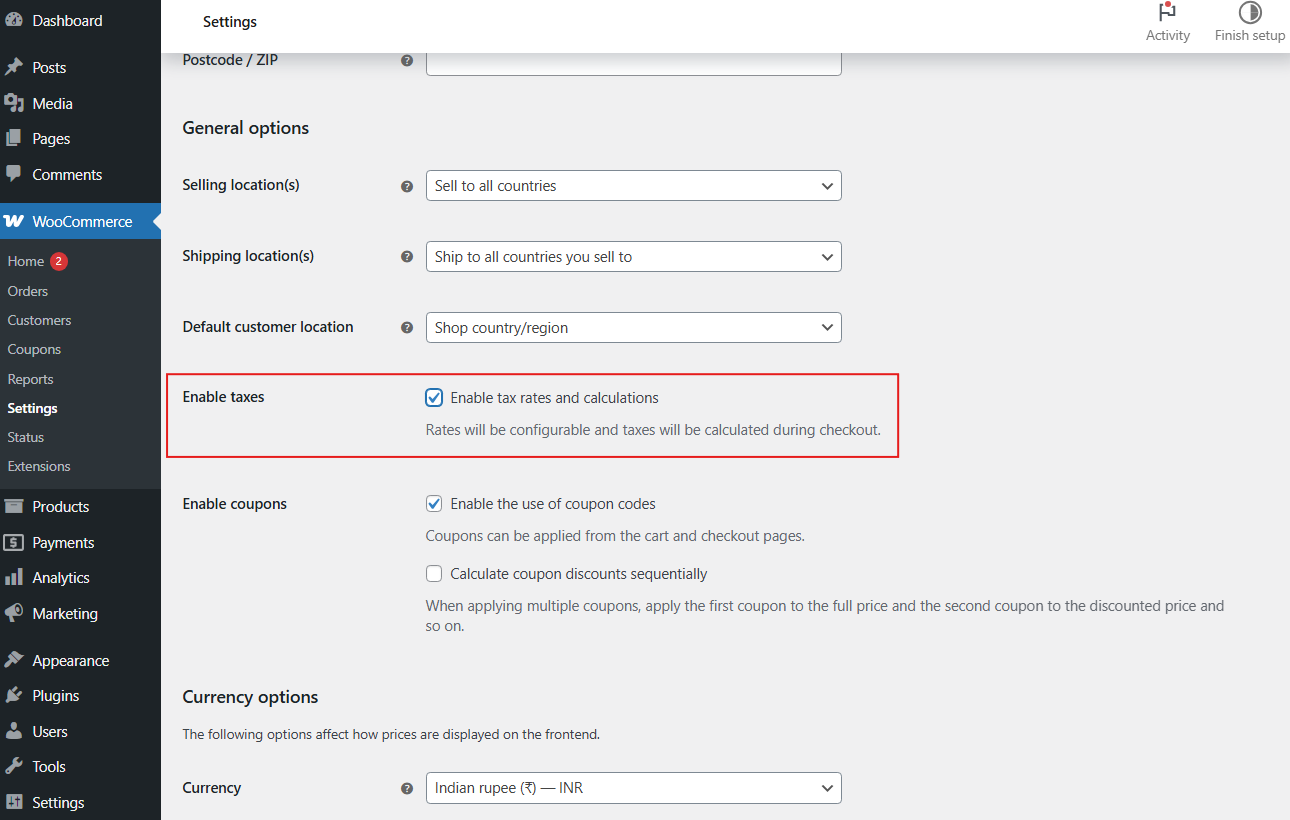
- Go to WooCommerce > Settings > General.
- Find the box labeled “Enable taxes and tax calculations” and check the box.
- Click “Save changes”.
Enabling this option will add a Tax tab to your WooCommerce settings, allowing you to configure tax options.
Step 2: Configure General Tax Settings
After enabling taxes:
- Navigate to WooCommerce > Settings > Tax.
- Configure the following options:
- Prices Entered With Tax: Decide if you want your product prices to include tax or if tax should be added at checkout.
- Calculate Tax Based On: Choose how taxes are calculated—based on your customer’s shipping address, billing address, or your store’s base location.
- Shipping Tax Class: Determine the tax class applicable to shipping charges.

These settings allow WooCommerce to calculate taxes accurately based on your preferences and regional requirements.
WooCommerce Tax Options Explained
Prices Entered with Tax
- Inclusive: The price you set already includes tax. For example, if you list a product at $50 with a 10% tax, the base price is actually $45.45, and the tax portion is $4.55.
- Exclusive: Tax is added on top of the listed price. So, if your product is $50 and tax is 10%, the customer pays $55 at checkout.
Calculate Tax Based On
- Customer Shipping Address: Tax is determined by where the order is being delivered.
- Customer Billing Address: Tax is applied based on the customer’s billing details.
- Shop Base Address: Your store’s location is used to calculate tax, no matter where the customer is.
Shipping Tax Class
- Based on Cart Items (Default): The highest applicable tax rate from the cart items is used for shipping.
- Standard Rate: A fixed, standard tax rate is applied to shipping.
- Additional Tax Classes: You can create custom tax rates to fit your needs.
Rounding
- Line Item Level (Default): Each product’s tax is calculated and rounded separately.
- Subtotal Level: The total tax is calculated first and then rounded.
Display Settings
- Shop Prices: Choose whether to display prices with or without tax included.
- Cart & Checkout Prices: It’s best to match these settings with shop prices to prevent rounding discrepancies.
- Price Display Suffix: Add labels like “(incl. tax)” or “(excl. tax)” to make pricing clear.
- Tax Totals: Show taxes as a single total or break them down by item.
Once configured, click Save changes to apply your tax settings.
Step 3: Define Tax Classes and Rates
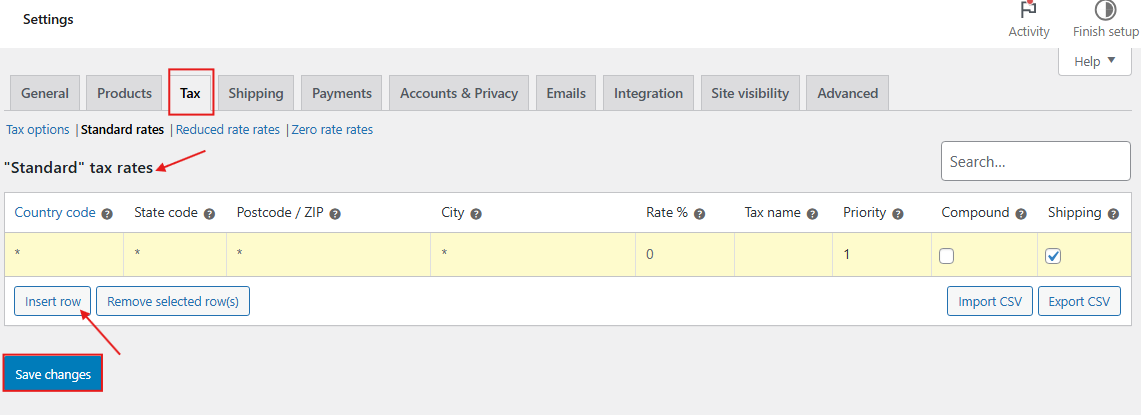
WooCommerce provides default tax classes: Standard Rates, Reduced Rate Rates, and Zero Rate Rates. To define or modify tax rates:
- Go to Tax Tab – You’ll see links to different tax classes (e.g., Standard Rates). Click on the one you want to configure.
- Add a New Tax Rate – Click “Insert Row” to create a new entry.
- Fill in the necessary details:
- Country Code: Enter the two-letter code (e.g., “US” for the United States).
- State Code: Add the state code if needed (e.g., “CA” for California).
- ZIP/Postcode: Specify if the tax applies to certain areas. City: Enter city names if the tax is location-specific.
- Rate (%): Input the tax percentage (e.g., “8.25” for 8.25%).
- Tax Name: Label the tax (e.g., “Sales Tax”). Priority: Set the priority if multiple taxes apply.
- Compound: Check this box if the tax should be calculated on top of other taxes.
- Shipping: Choose if this tax applies to shipping charges.
- Click “Save Changes” to apply the tax rates.
Repeat these steps to add additional tax rates for different regions or tax classes as needed.
Step 4: Assign Tax Classes to Products
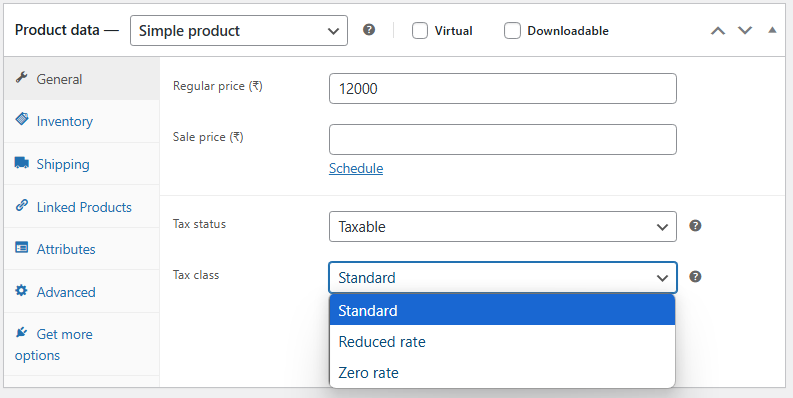
To ensure products are taxed correctly, edit a product in your WooCommerce store. Select any product from your store then:
- In the Product Data, go to the General tab.
- Locate the Tax Class dropdown menu and select the appropriate tax class for the product.
- Update or publish the product to save changes.
Assigning the correct tax class to each product ensures that customers are charged the appropriate tax rates during checkout.
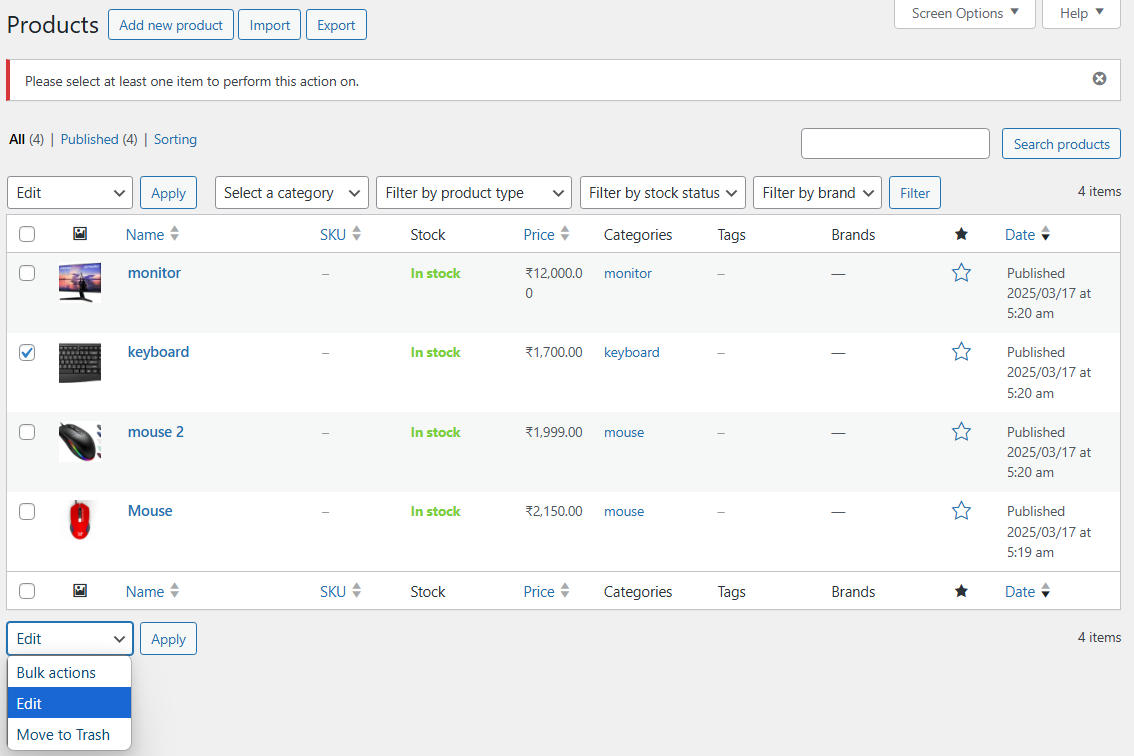
Applying Tax Rates in Bulk
- Select products by checking their boxes.
- Click Bulk Actions > Edit > Apply.
- In the Bulk Editor, you can quickly update tax settings for multiple products at once:
- Select Products – Check the boxes for the products you want to update.
- Open Bulk Actions – Click “Edit” and then “Apply” to open the bulk editor.
- Set Tax Status – Choose “Taxable,” “Shipping only,” or “None” based on your needs.
- Choose Tax Class – Assign the correct tax class (e.g., Standard, Reduced Rate, or a custom class).
- Click Update to apply changes.
WooCommerce Tax Reports
- Access reports via WooCommerce > Reports > Taxes.
- View tax data sorted by code or year.
- If newly set up, data may not be available yet, but this section is crucial for tax filing.
To simplify this process, you can use the WooCommerce tax extension that automatically applies the correct tax rates based on country, city, and other attributes.

Mastering Tax Refunds and Adjustments in WooCommerce!
Let’s be real—taxes can be a bit of a headache, especially when errors pop up! Whether you’re dealing with a miscalculated rate or a customer returns an item, knowing how to manage tax refunds and adjustments is essential for keeping your WooCommerce store running smoothly. That’s why setting up taxes in WooCommerce the right way can save you from future stress.
So, what happens when a refund situation arises? WooCommerce has your back with flexible tax handling options! Here’s what you need to know:
- Partial Refunds? No Problem! Sometimes, customers return only part of their order. When this happens, WooCommerce lets you adjust the tax amount accordingly so that your records stay accurate.
- Full Refunds Made Simple: If a customer sends back an item in full, you can issue a complete refund, including the tax amount, ensuring a hassle-free experience for both you and your buyers.
- Oops! Tax Calculation Errors? Mistakes happen! If you discover an issue in past transactions, you can revise your tax settings to make the necessary corrections and prevent future miscalculations.
Essential Tax Considerations for Your WooCommerce Store

When it comes to setting up taxes in WooCommerce, a little extra effort goes a long way! Staying on top of tax updates, using the right tools, and getting expert advice can save you from compliance headaches. Here are some key considerations to keep your tax setup smooth and stress-free:
- Keep Tax Rates Updated – Tax laws change, and you don’t want to be caught off guard. Regularly review and update your tax settings to ensure you’re always in compliance with the latest regulations.
- Get Expert Advice – Tax laws can be complex and vary by region. Consulting a tax professional can help you navigate the nuances of setting up taxes in WooCommerce correctly and avoid costly mistakes.
- Automate with Tax Plugins – Selling in multiple regions? Tax automation plugins can handle calculations and updates for you, ensuring accuracy and efficiency without the manual hassle.
At the same time, using a reliable store hours plugin lets you control exactly when your store is open, which is especially useful for managing orders during holidays or off-hours. When both your taxes and store hours are well-managed, your shop feels more organized, professional, and customer-friendly.
Managing Tax Exemptions in WooCommerce!
Taxes can be tricky, but did you know that some customers or organizations may qualify for tax exemptions? Setting up taxes in WooCommerce the right way ensures you don’t overcharge exempt buyers while keeping your store compliant.
So, how can you handle tax exemptions seamlessly in WooCommerce? Here are some smart ways to do it:
- Automate with a Plugin – Use a tax exemption plugin to validate and approve exempt customers automatically. No manual work, no fuss!
- Create Tax-Exempt User Roles – Have nonprofit organizations or government entities shopping on your store? Assign them a tax-exempt role so they don’t get charged unnecessary taxes.
- Offer Tax-Exempt Coupons – Need a quick fix? Provide special tax-exempt coupons for eligible purchases that override the standard tax rules and keep everything in check.
By setting up taxes in WooCommerce properly, you not only avoid compliance headaches but also build trust with your customers. No one likes being overcharged, and getting exemptions right helps create a smooth shopping experience for those who qualify.
If you’re also using WooCommerce affiliate plugins to bring in new traffic and sales, clear tax settings make a big difference. It keeps things simple when tracking commissions and paying your affiliates. A store that runs smoothly behind the scenes is one that both customers and partners enjoy being part of.
Don’t let tax exemptions be a mystery, take control by setting up WooCommerce taxes like a pro!
Final Thoughts
Managing WooCommerce taxes might not be the most glamorous part of running an online store, but it’s one of the most important. From setting up the right tax rates to handling exemptions, refunds, and automated calculations, a little attention now can save you from big problems later. When taxes are configured correctly, your customers enjoy a clear and transparent checkout process, and you avoid legal headaches.
To expand your reach, try a Ad Management plugin and grow your business through trusted referrals. You can also enhance your checkout process with our guide on customizing the WooCommerce Thank You page or improve product visibility with meta tags in WordPress. These simple upgrades can help you create a more organized, professional, and customer-friendly shopping experience.
At the end of the day, WooCommerce taxes don’t have to be intimidating. With the right setup and tools, you can handle them confidently and focus on what you do best, growing a store your customers love.