Let’s paint a quick picture. You’ve got a WooCommerce store filled with all kinds of goodies, maybe you’re selling handmade candles, yoga mats, ceramic mugs, and foldable desks. Now, imagine trying to charge a single shipping fee for all those items. Sounds like a mess, right? That’s exactly why shipping classes exist.
Shipping classes in WooCommerce help you avoid one-size-fits-all shipping prices. They give you the flexibility to group products based on how they should be shipped. So if a candle costs less to ship than a desk (which it absolutely should), you can charge accordingly. Your customers get fair rates, and you avoid losing money on shipping heavy or oversized items.

Whether you’re a new store owner or just figuring out better ways to organize shipping costs, this guide is here to help. By the end, you’ll be able to confidently set up product-specific shipping rules that make life easier for you and your buyers. If you’re just starting out, first set up basic shipping in WooCommerce before jumping into advanced features like shipping classes.
Let’s dive into the world of smart shipping setup, because your products deserve more than guesswork when it comes to shipping fees.
In this Blog
What are Shipping Classes?
Think of shipping classes in WooCommerce like little name tags for your products. But instead of saying “Hi, I’m Steve,” they say things like “I’m light and cheap to ship!” or “I’m oversized and need special handling.” These tags help WooCommerce figure out how much to charge for shipping each product.
A shipping class is essentially a label you assign to products that share similar shipping needs. You create a class once, then apply it to as many products as you want. Later, you use these classes to set up custom shipping rates, so you’re not stuck charging the same amount for a mug and a microwave.
Here’s a simple way to look at it:
- A T-shirt might fall under a “Small Package” class
- A wall clock might fit into a “Medium Box” class
- A big ol’ bean bag chair might belong in the “Bulky Item” class
Shipping classes themselves don’t do anything until you combine them with a shipping method like Flat Rate. That’s when WooCommerce goes, “Oh, so this product has the ‘Bulky’ tag? I’ll charge $20 to ship it!”
Without classes, you’d either have to create separate shipping rules for every product (yikes) or settle for a flat shipping cost that doesn’t reflect reality (also yikes). So, shipping classes = more control, less confusion.
It’s a smart way to add structure, especially if you’re selling a variety of products with very different sizes, weights, or packaging needs.
When to Use Shipping Classes?
Alright, so you’re probably wondering, do I actually need to bother with shipping classes in WooCommerce? That depends on what kind of products you’re selling and how you want to manage your shipping strategy.
As soon as you start offering products that vary in shape or weight, shipping classes can become your best friend. You can also manage when your store is open for orders using a WooCommerce store hours plugin, which pairs well with conditional shipping settings.
Here are a few scenarios where using shipping classes just makes sense:
Scenario 1: You sell small and large products together
Imagine running an online store that sells both stickers and office chairs. Charging the same $10 shipping fee for both is going to look weird. Customers buying a lightweight item will feel overcharged, while those buying furniture might not be covering the true shipping cost. With classes, you can split your catalog and assign appropriate rates.
Scenario 2: You want to offer flat rate shipping based on product type
Maybe you want all books to ship for $5, posters for $3, and mugs for $7. That’s super easy to do once you’ve set up product-specific shipping classes. You just tell WooCommerce, “If it’s a book, charge this. If it’s a mug, charge that.”
Scenario 3: You sell fragile or high-maintenance items
Products like glassware, electronics, or handmade pottery might require extra packaging or a premium delivery service. By assigning them to a special shipping class, you can make sure the cost reflects the care they need in transit.

Scenario 4: You offer promotional shipping
Let’s say you’re offering free shipping only on a certain category of items, like your new summer collection. With a dedicated class for those products, you can set that rule without affecting everything else in your store.
Basically, anytime you need product-specific shipping in WooCommerce, shipping classes are the answer. They give you the power to get precise, flexible, and fair with your rates, and that means fewer abandoned carts, more trust, and a better shopping experience for everyone.
Creating New Shipping Classes
So, you’ve decided to take the plunge and get your WooCommerce shipping game in order. Good choice! The first real step is creating your actual shipping classes. Don’t worry, this part is super straightforward, and you only have to do it once for each class.
Let’s walk through how to create shipping classes in WooCommerce, step by step.
Step 1: Head to Your Shipping Settings
From your WordPress dashboard, hover over WooCommerce in the left menu and click Settings. Once you’re in, go to the Shipping tab at the top. This is your command center for everything shipping-related.
Step 2: Click on “Shipping Classes”
You’ll see a row of sub-tabs, click the one that says Shipping Classes. This is where the magic happens. You’ll see a blank table if you haven’t created any classes yet.
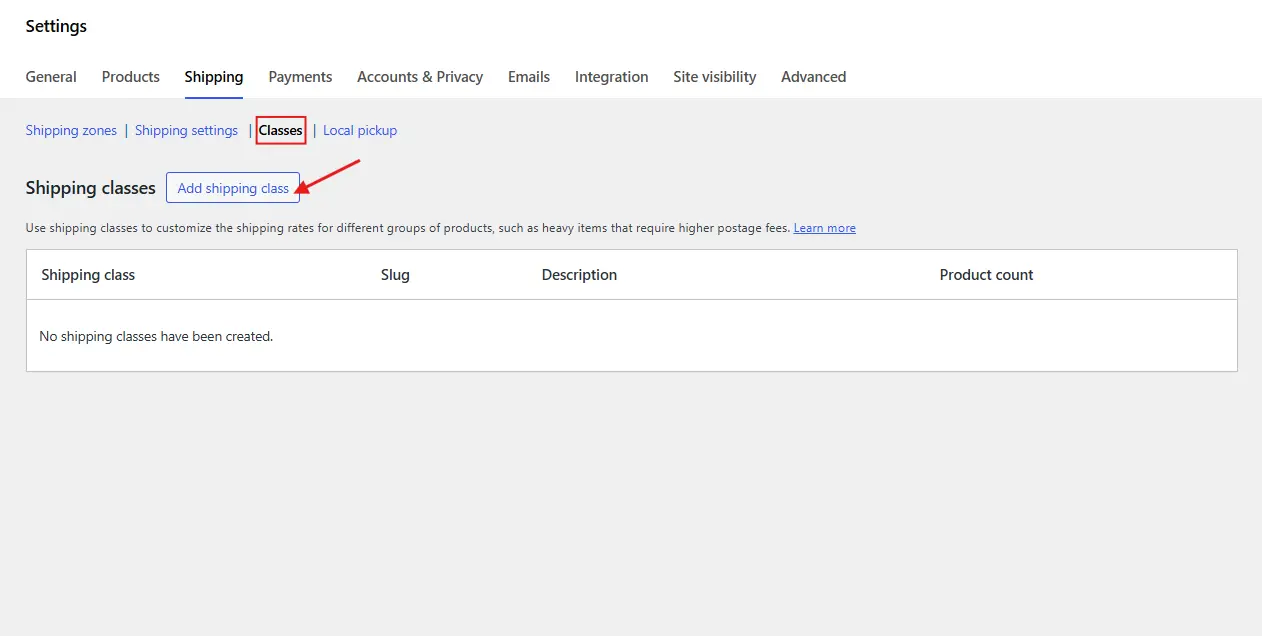
Step 3: Add a New Class
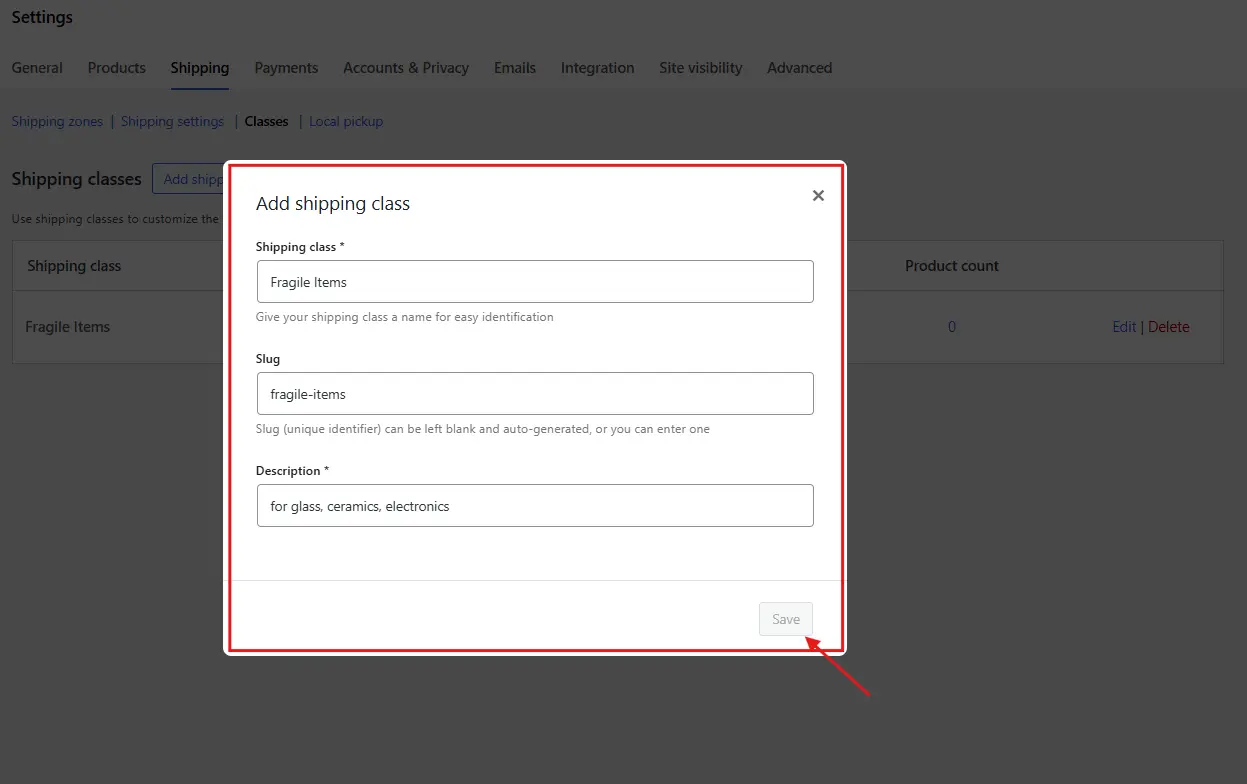
Click the Add Shipping Class button. A few fields will pop up:
- Shipping Class Name: This is what you’ll see when assigning the class to a product. Make it descriptive, like “Heavy Items” or “Express Delivery.”
- Slug (optional): This is used internally by WordPress. You can leave it blank, and WooCommerce will auto-fill it.
- Description (optional): This is just for your reference, customers won’t see it.
Once you’ve filled it out, hit Save Shipping Classes at the bottom.
Step 4: Rinse and Repeat
You can create as many classes as you need. For example:
- “Lightweight Items” for anything under 500g
- “Bulky Goods” for furniture or gym gear
- “Fragile Items” for glass, ceramics, or sensitive electronics
And just like that, you’ve got a way to group products by their shipping needs!
Pro Tip: Keep Names Simple
Avoid overcomplicating it. Choose names that clearly describe the product category or shipping style. You’ll thank yourself later when assigning classes to dozens, or even hundreds, of products.
Now that you’ve created the classes, it’s time to assign them to your products so WooCommerce knows what goes where. Let’s move on.
Assigning Classes to Products
Alright, you’ve got your shiny new shipping classes set up, great job! But right now, they’re just sitting there with no idea what to do. It’s time to introduce them to your products. This step tells WooCommerce, “Hey, this item belongs to that class, so use those shipping rules.” For stores selling items in bulk or packs, you may also want to set quantity steps per product for better order management.
There are two easy ways to assign shipping classes in WooCommerce: one by one, or in bulk. Let’s look at both options.
Method 1: Assigning a Class to a Single Product
This method is great if you’re working on a few items or adding a new product to your store.
- Go to your dashboard and click Products > All Products.
- Find the product you want to update and click Edit.
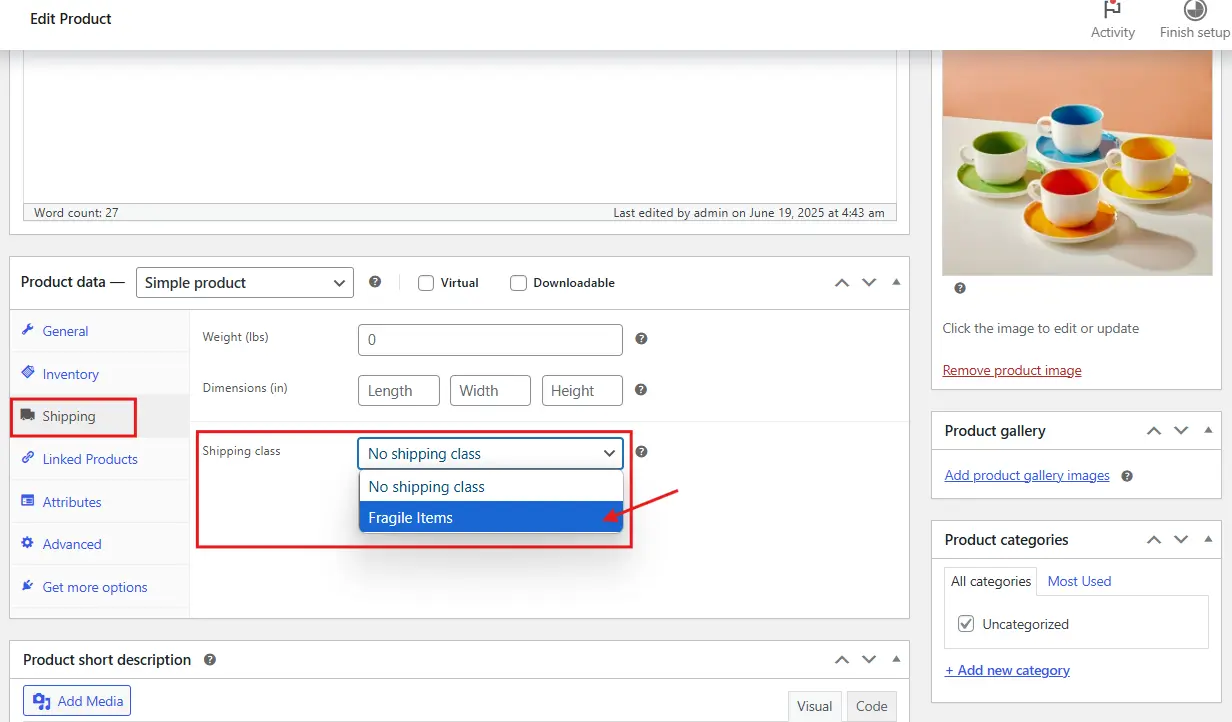
- Scroll down to the Product Data section (the box with tabs like General, Inventory, Shipping, etc.).
- Click the Shipping tab inside that box.
- You’ll see a dropdown called Shipping Class. Pick the right class from your list.
- Click Update on the top right to save your changes.
And that’s it! That product is now part of the team.
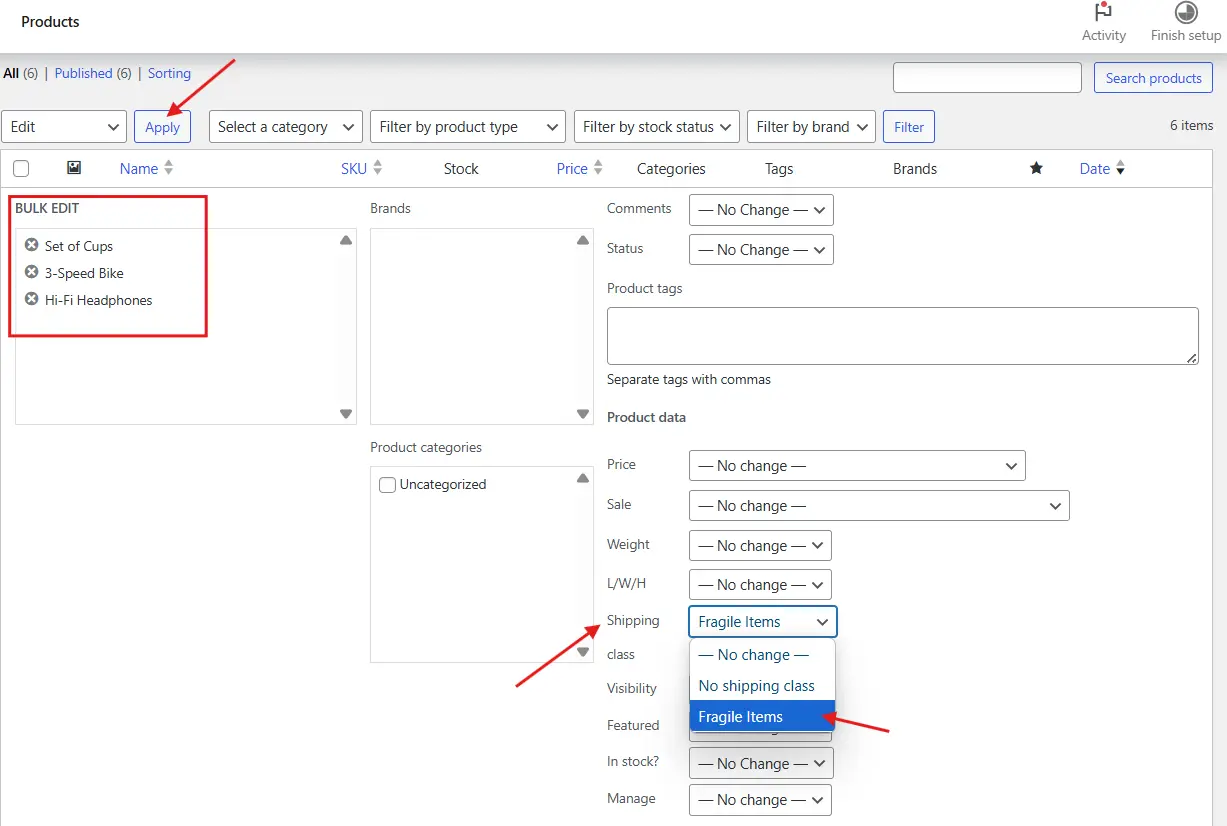
Method 2: Assigning Shipping Classes in Bulk
If you’ve got lots of products to update, don’t worry. WooCommerce lets you assign shipping classes in batches. Here’s how:
- Go to Products > All Products.
- Use the checkboxes to select multiple items that belong to the same shipping class.
- Click the Bulk Actions dropdown at the top, choose Edit, then click Apply.
- A bulk edit panel will appear. Find the Shipping Class dropdown, pick your desired class, and click Update.
Voilà! All selected products are now officially part of their new shipping category.
Helpful Tip: Use Filters to Speed Things Up
If you’ve already grouped your products by category or tag, you can use the search or filter bar at the top to quickly find items. Then use the bulk editor to assign the correct class without having to scroll endlessly.
Assigning shipping classes in WooCommerce might seem small, but it’s the key that unlocks accurate, customized shipping rates. Once your products are grouped properly, the rest of the setup becomes way more manageable, and your store becomes more efficient.
Up next: How to use those classes to apply different shipping rates!
Applying Different Rates to Each Class
Now that your products are all sorted into their new shipping classes like little champions, it’s time to do the real magic—assigning different shipping rates to each class. This is where WooCommerce takes your rules and turns them into real prices at checkout.
We’re going to use the Flat Rate shipping method here, because it works beautifully with shipping classes. Don’t worry if you’ve never touched this setting before. I’ve got you covered.
Step-by-Step: Set Shipping Costs for Each Class
- Head back to WooCommerce > Settings > Shipping.
- Choose the Shipping Zone where you want these rates to apply. For example, maybe you’re setting this up for all orders within India or the U.S.
- Click Edit next to that zone.
- If you don’t already have a Flat Rate method added, click Add Shipping Method and select Flat Rate from the dropdown. Then hit Add Shipping Method again.
- Now click Edit next to the Flat Rate method.
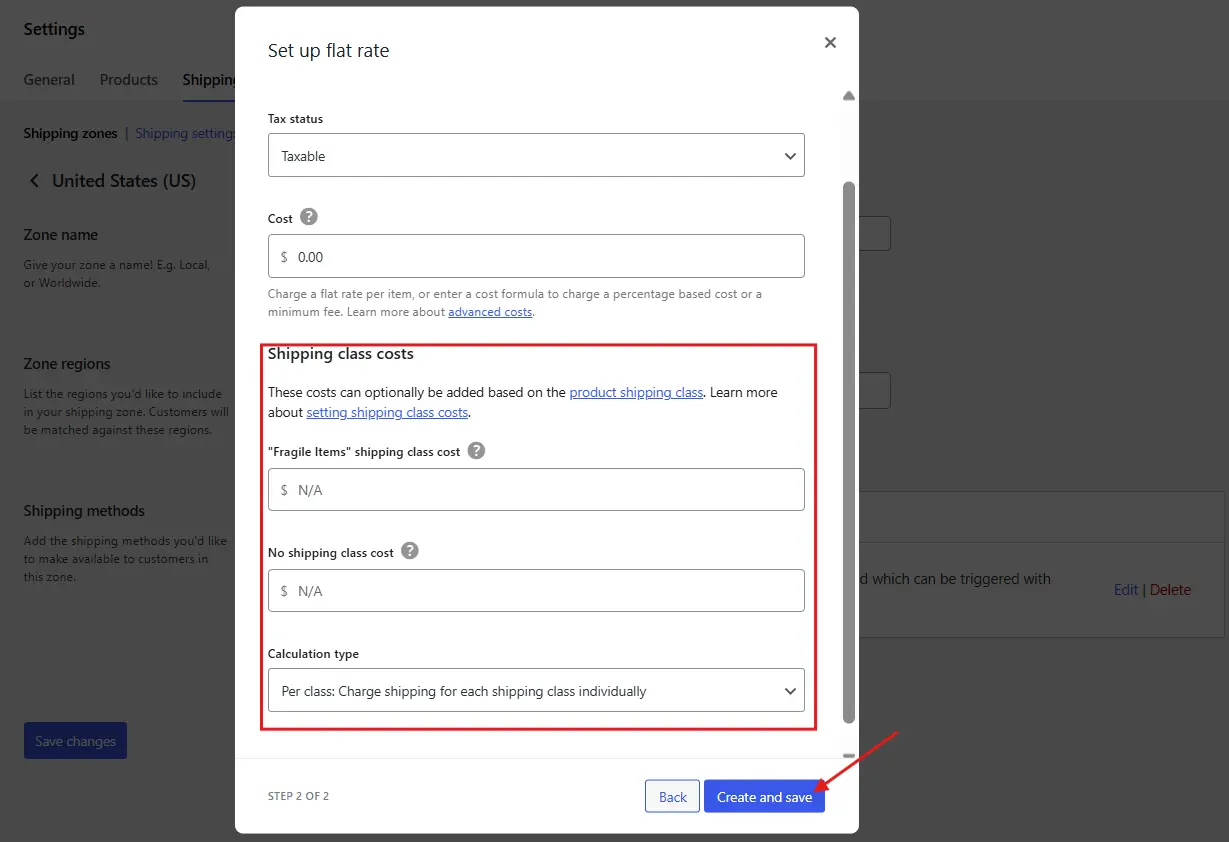
This brings you to a page where you can enter shipping costs for each class.
You’ll see a table that includes:
- A Cost field for the entire order
- A list of your Shipping Classes, each with its own cost input
- A No Shipping Class Cost field (this applies to products without any assigned class)
Example:
Let’s say you’ve got three classes:
- Lightweight Items: $3
- Bulky Goods: $15
- Fragile Products: $7
Just type those values into the corresponding fields, hit Save Changes, and you’re good to go!
Bonus: Use Simple Math for Advanced Pricing
If you want more control, WooCommerce supports some simple math inside those cost fields. Try these examples:
[qty] * 2→ Charges $2 per item in that class10 + ( [qty] * 3 )→ Charges $10 base plus $3 per item- Leave it blank → Charges nothing for that class (hello, free shipping)
Pro Tip: Use “Calculation Type” Wisely
Below the cost fields, you’ll see a Calculation Type option:
- Per Class: Adds the shipping rate for each shipping class in the cart
- Per Order: Only applies the highest single rate from the classes
Choose what makes sense for your business. If you want customers to only pay one shipping fee even if they order multiple product types, go with Per Order. But if you want fees to stack up based on the mix of items, Per Class is the way to go.
Testing the Setup
Before going live, test everything like a customer would.
Quick Testing Checklist:
- Add products from different shipping classes to cart
- Go to checkout and verify correct shipping rates
- Test combinations of different classes together
- Try with different quantities and zones
If anything looks off, go back to your flat rate settings and double-check class rates or product assignments. Before testing your new shipping classes live, you can temporarily disable your WooCommerce store to avoid confusing your customers.
Advanced Use: Combining Classes + Zones
Shipping classes get even more powerful when you combine them with shipping zones. This way, you can charge different rates not just by product type, but also by region.
Example:
- Charge $10 for heavy items in your local area
- Charge $25 for the same heavy items internationally
To do this:
- Create different Shipping Zones (like US, Canada, Europe)
- Add Flat Rate shipping methods inside each zone
- Set different shipping class rates for each zone
You now have a shipping setup that’s flexible, scalable, and cost-accurate. If you’re managing multiple stores through a network, you can even use shipping classes across multiple stores with WooCommerce multisite.
Conclusion
Shipping can make or break a customer’s buying decision, especially if fees feel random or unfair. With shipping classes in WooCommerce, you’re putting logic behind your shipping costs, based on real product needs.
Whether you’re selling delicate jewelry or bulky gym equipment, assigning products to smart shipping classes ensures transparency and efficiency. Combine them with zones, and you’ve got a professional shipping setup that grows with your store.
If you enjoyed this guide, don’t miss out on these gems:
- Best Plugins to Manage WooCommerce Store Hours: 2025 Edition
- How to Export WooCommerce Orders with 2 Easy Methods: Ultimate Guide
- How to Hide Related Products for a Specific Category in WooCommerce
- Custom Add to Cart Links in WooCommerce: Easy 3-Step Guide
- WooCommerce: How to Enable Product Reviews for Logged Out Users (2 Easy Steps)