Customizing the appearance of your WordPress site is essential for creating a unique and engaging user experience. One effective way to achieve this is by adding custom CSS (Cascading Style Sheets), which allows you to modify the design elements of your site beyond the default theme settings.
This guide will walk you through various methods to add custom CSS to your WordPress site, ensuring your customizations are both effective and sustainable.
What is CSS?
Imagine your website is a plain, boring sandwich—just bread and cheese. Sure, it works, but wouldn’t it be better with some lettuce, tomatoes, and a fancy sauce? That’s where CSS (Cascading Style Sheets) comes in! It’s like the magic ingredient that makes your website look awesome, adding colors, fonts, layouts, and animations to your otherwise basic HTML structure.
CSS tells your web browser how things should look—whether a button should be red, text should be bold, or an image should have a cool shadow. Without CSS, the internet would be a pretty dull place!
Why Add Custom CSS to Your WordPress Site?
WordPress themes are great, but let’s face it—sometimes they just don’t do exactly what you want. That’s where custom CSS comes in!
Here’s why adding custom CSS to your WordPress site is a game-changer:
🔹Make Your Site Uniquely Yours: Stand out from the crowd by customizing fonts, colors, buttons, and layouts to match your brand’s personality. You can also create custom WordPress login pages for uniqueness of your website.
🔹 Fix Theme Limitations: Themes come with pre-set designs, but what if you want to tweak spacing, change a background color, or style a specific section? Custom CSS lets you go beyond the default settings.
🔹Enhance Mobile Responsiveness: Not every theme looks perfect on all devices. Custom CSS helps you adjust margins, padding, and font sizes to ensure a smooth experience on phones, tablets, and desktops.
👉 Learn How to Add Code Snippets to Functions.php File
🔹Improve User Experience: Subtle animations, hover effects, or custom buttons can make navigation more interactive and engaging for visitors.
🔹Quick Styling Without Plugins: Many plugins offer design tweaks, but they can slow down your site. With a few lines of CSS, you can achieve the same effects, without adding extra bloat.
Methods to Add Custom CSS in WordPress
There are several approaches to incorporating custom CSS into your WordPress site. Each method has its own advantages and considerations:
Method 1: Using the WordPress Customizer
WordPress offers a built-in feature to add custom CSS through the Customizer, providing a user-friendly interface with a live preview of your changes.
Here, we are using the given custom CSS code:
/* General Styling */
body {
font-family: Arial, sans-serif;
color: #333;
background: #f9f9f9;
}
/* Typography */
.entry-title, .post-title {
font-size: 26px;
color: #0073aa;
font-weight: bold;
}
p {
font-size: 18px;
color: #444;
}
/* Links */
a {
color: #0073aa;
text-decoration: none;
transition: 0.3s;
}
a:hover {
color: #ff6600;
text-decoration: underline;
}
/* Buttons */
button, .wp-block-button__link {
background: #0073aa;
color: #fff;
padding: 10px 20px;
border-radius: 5px;
font-weight: bold;
transition: 0.3s;
}
button:hover, .wp-block-button__link:hover {
background: #ff6600;
}
/* Images */
.post-thumbnail img {
width: 100%;
border-radius: 10px;
box-shadow: 0 4px 8px rgba(0, 0, 0, 0.1);
}
/* Blockquote */
blockquote {
border-left: 4px solid #0073aa;
padding: 10px;
background: #f1f1f1;
font-style: italic;
}
/* Responsive */
@media (max-width: 768px) {
.entry-title, .post-title {
font-size: 22px;
}
}
Steps:
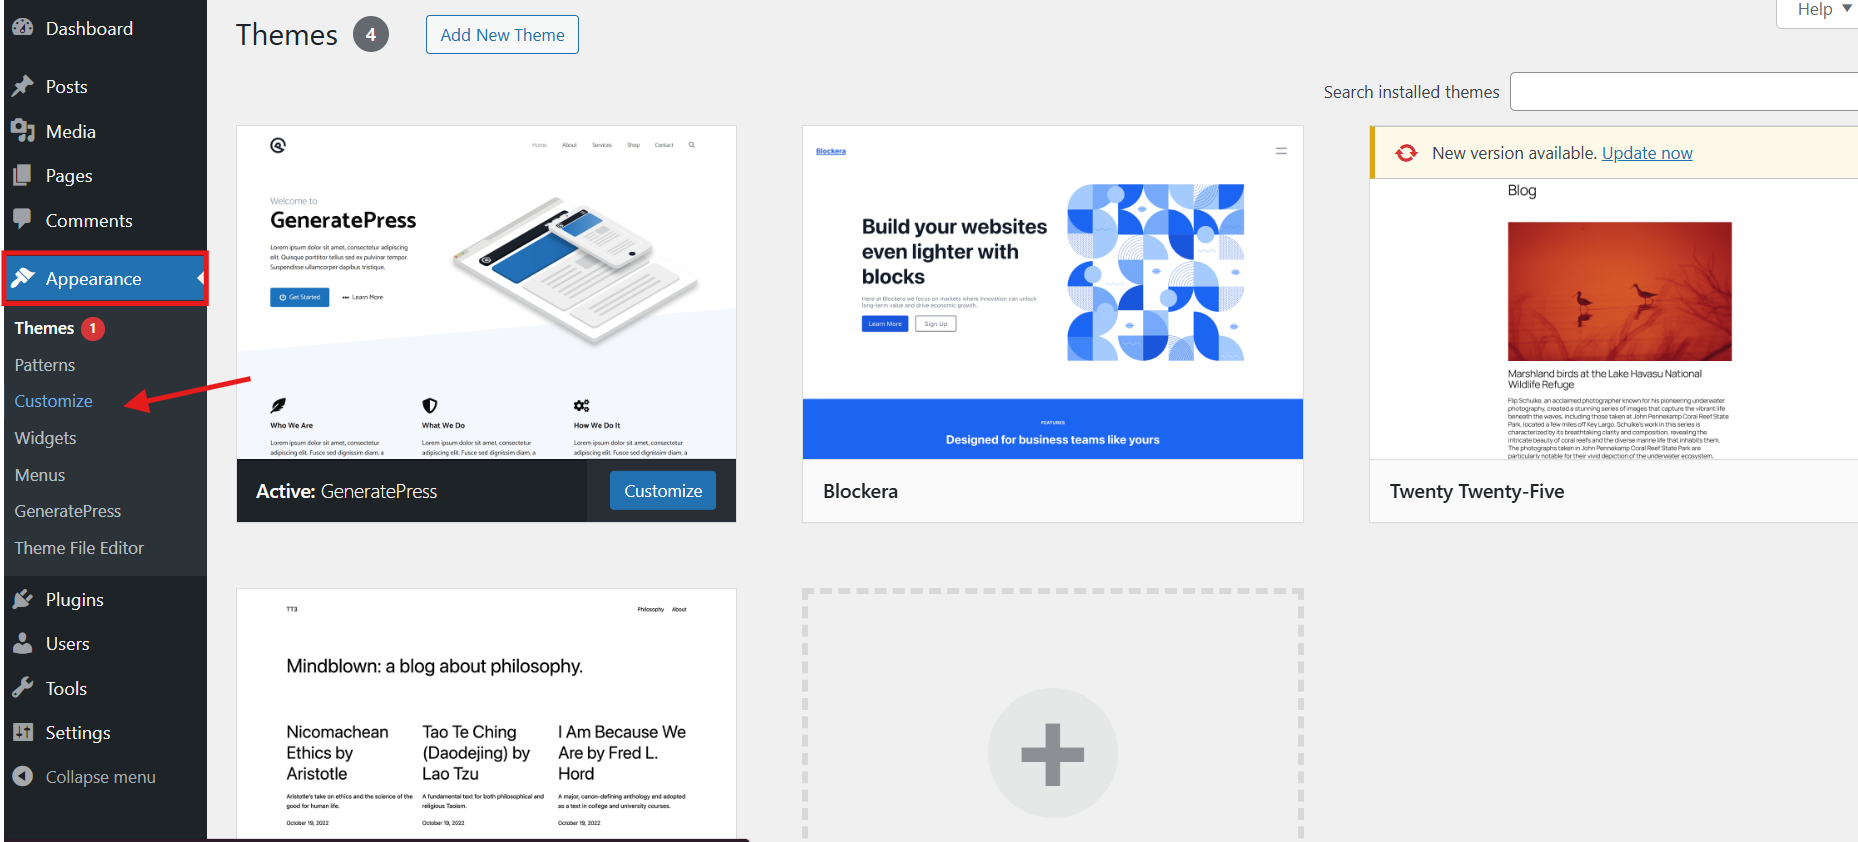
- Navigate to your WordPress dashboard.
- Go to Appearance > Customize.
- Click on the Additional CSS section.
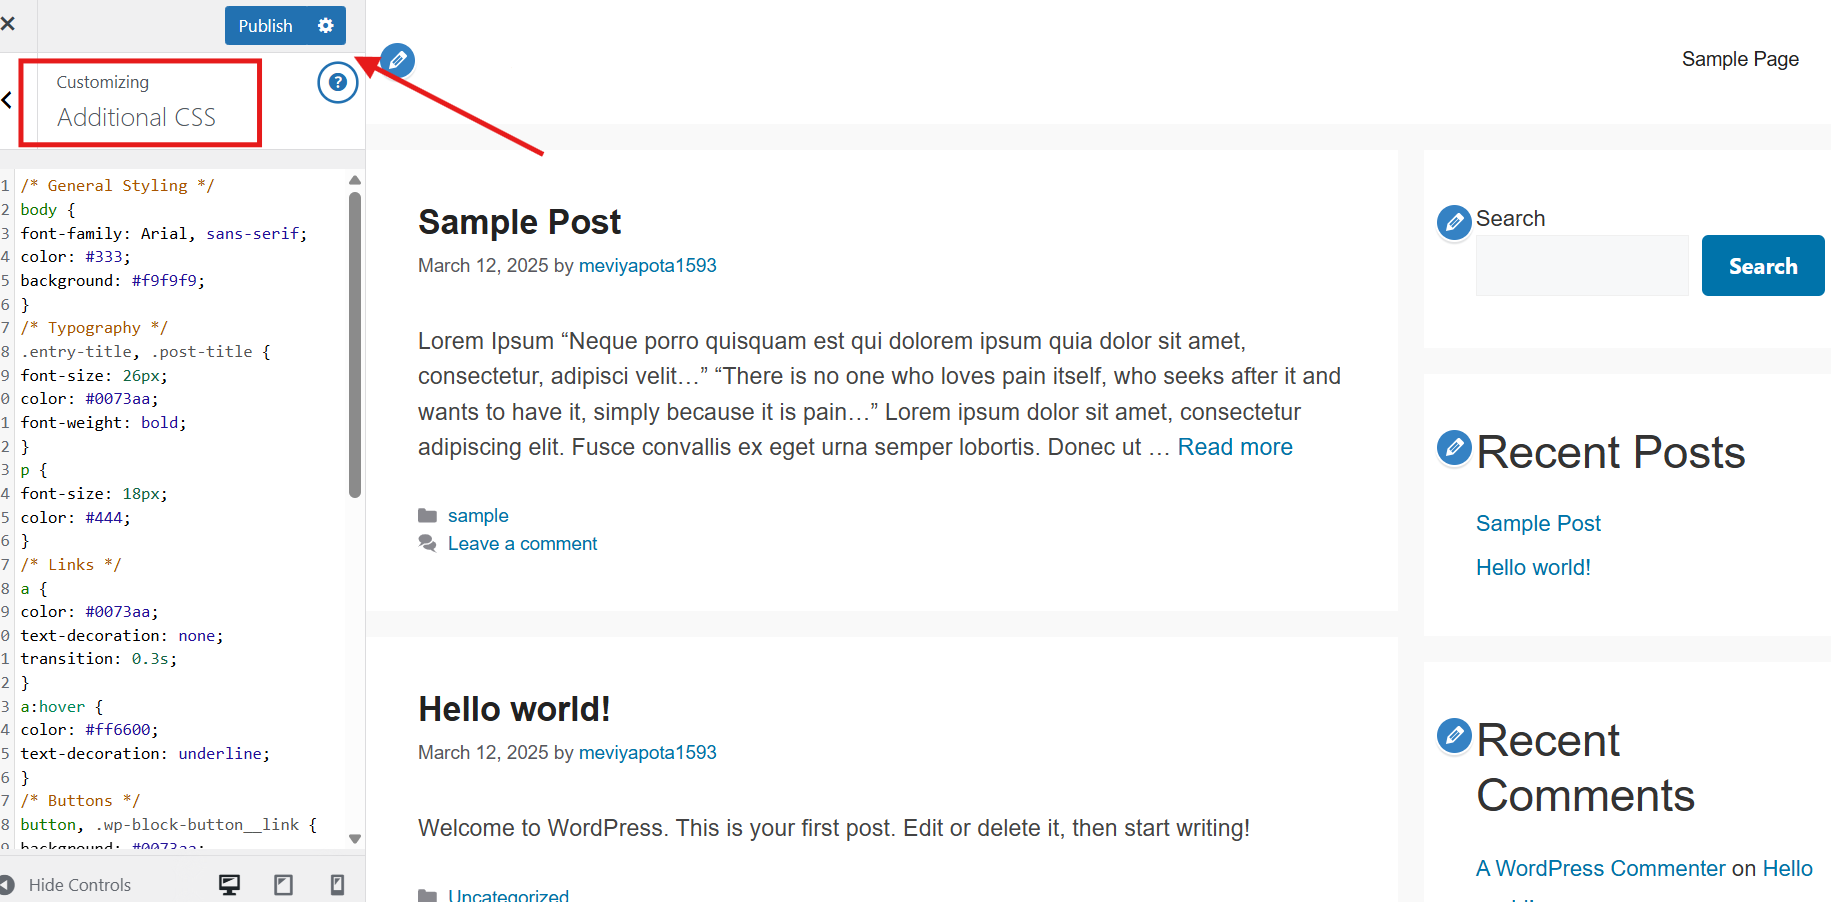
- Enter your custom CSS code in the provided text area.
- As you type, a live preview of your site will display the changes.
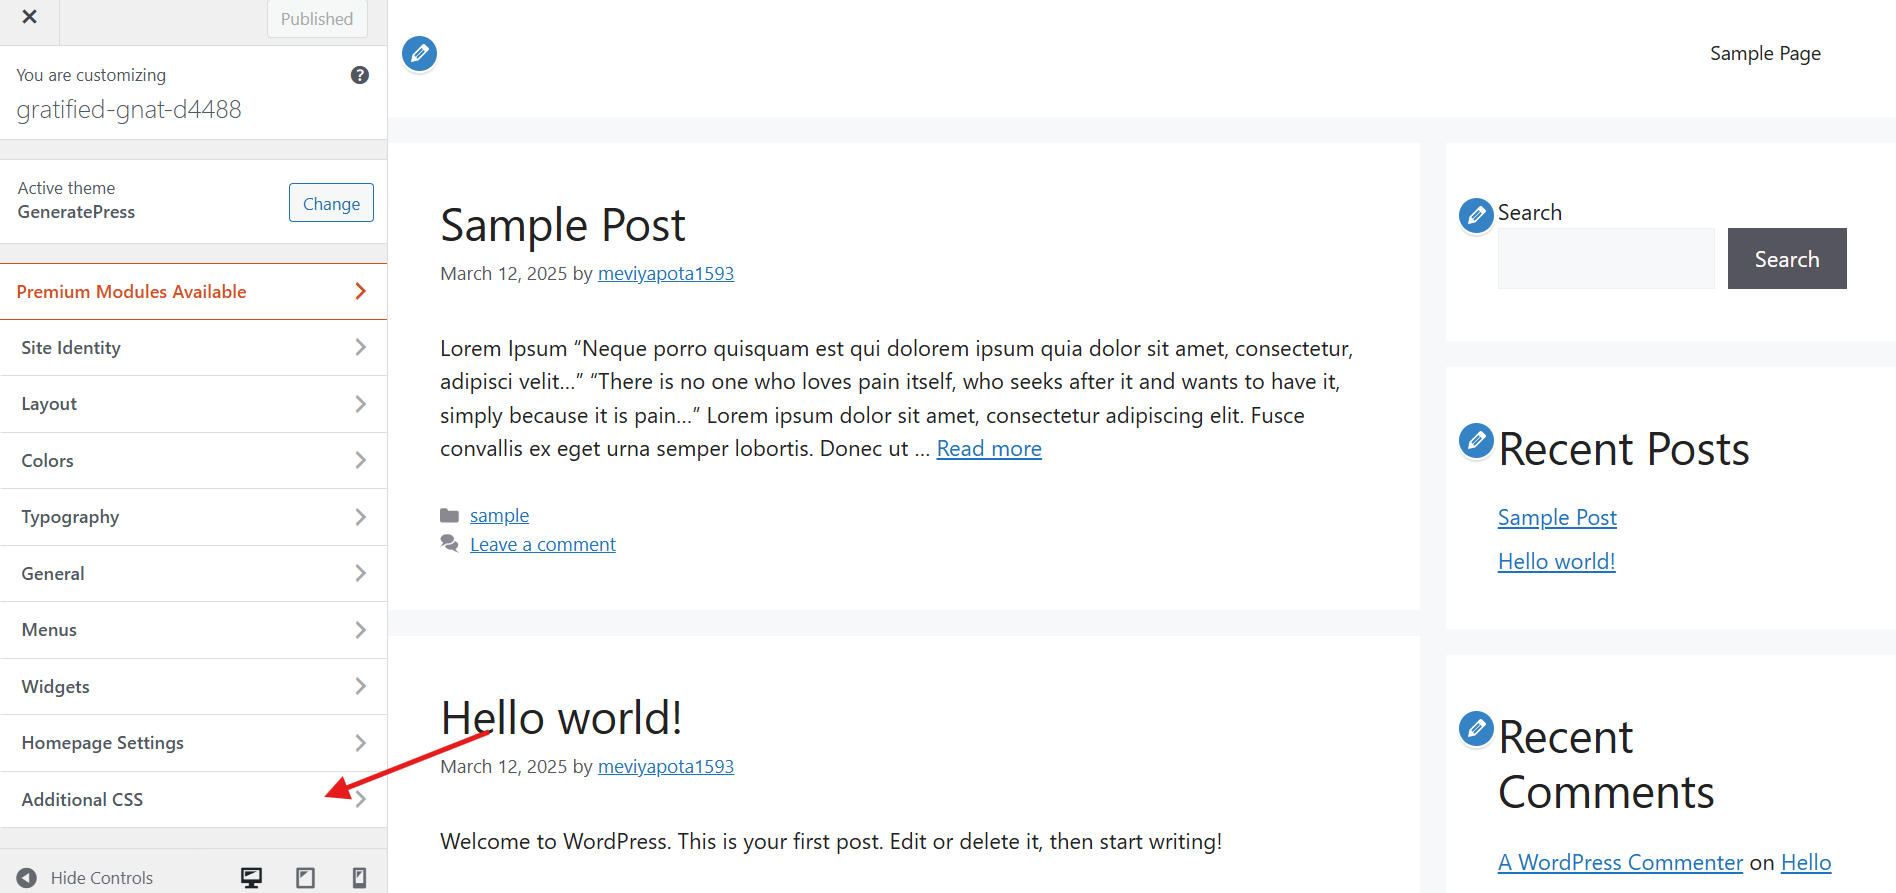
Once satisfied, click Publish to apply the changes.
Advantages:
- No need for additional plugins or theme modifications.
- Immediate visual feedback through the live preview.
- Safe, as it doesn’t involve editing core theme files.
Considerations:
Custom CSS added via the Customizer is theme-specific. If you switch themes, you will need to reapply your custom CSS. Make sure your website is accessible and the modifications comply!
Method 2: Using a Child Theme
Creating a child theme is recommended practice for making extensive customizations, including adding custom CSS. A child theme inherits the functionality and styling of the parent theme but allows you to make changes without affecting the original theme files.
To add custom CSS code using a child theme in WordPress, start by checking if you already have a child theme.
Verify Your Child Theme:
- Go to your WordPress Dashboard > Appearance > Editor (click ‘I understand’ if a warning appears).
- If the style.css file opens and contains a line like
Template: <theme name>, you’re using a child theme. If not, you’ll need to create one first.
Adding Custom CSS Code:
You can edit it directly in WordPress:
- Go to Appearance > Editor.
- If your child theme is active, you’ll see the correct
style.cssfile. - Add your custom CSS code and click Update File.
Or you can do it through SFTP:
- Connect to your site via SFTP or SSH.
- Download the
style.cssfile from your child theme. - Make your changes and re-upload the file, replacing the existing one.
Advantages:
- Preserves customizations even after updating the parent theme.
- Organizes all custom CSS in a dedicated stylesheet.
Considerations:
- It requires basic knowledge of theme file structure and FTP/SFTP access.
- More suitable for advanced users or those planning significant customizations.
Method 3: Adding a Custom CSS Class Using the Block Editor
For WordPress 5.9 and later, you can add custom CSS using the Gutenberg editor. This method is straightforward and ideal for block themes. Follow these steps:
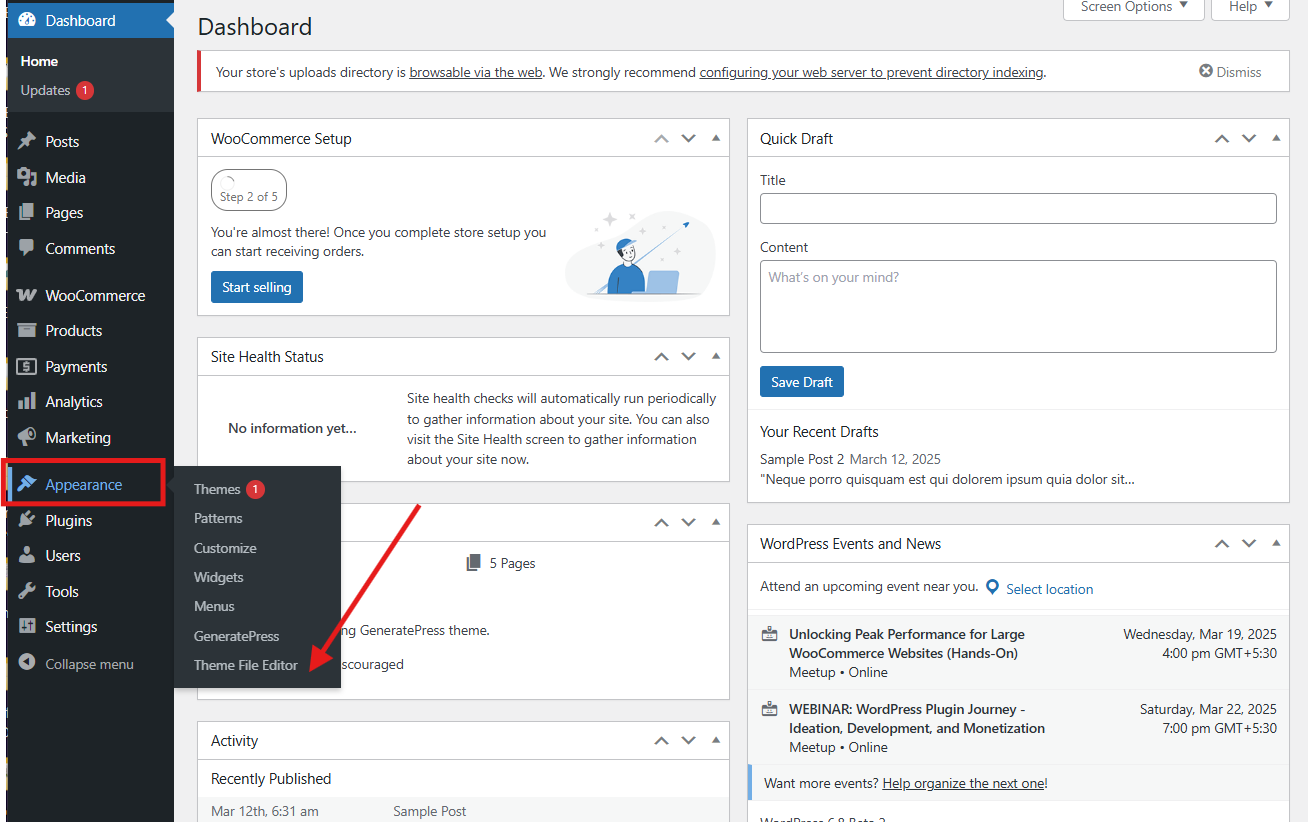
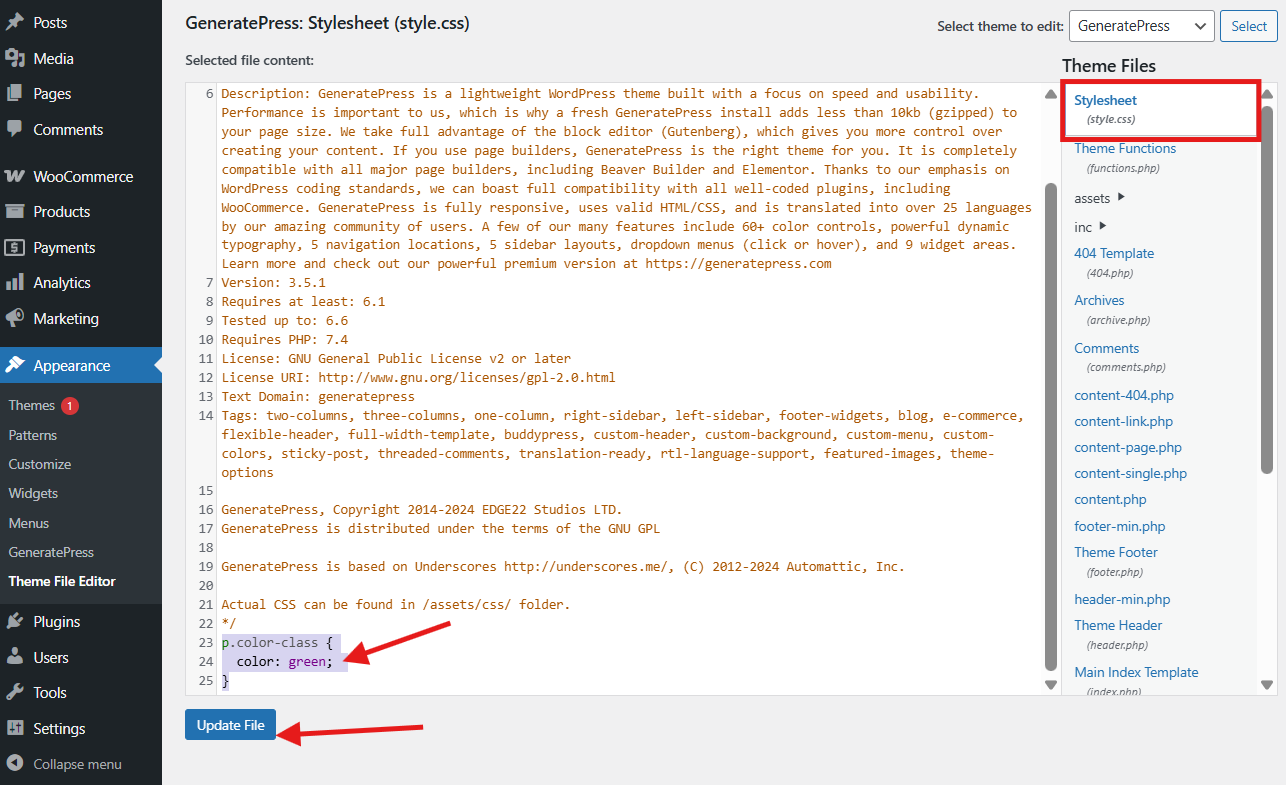
- Log in to your WordPress admin dashboard and go to Appearance > Theme File Editor.
- In the Theme Files sidebar, select the
style.cssfile. - Scroll to the bottom of the file and add your custom CSS class.
For example, to change paragraph text to green, add:
p.color-class {
  color: green;
}
Click Update File to save your changes.
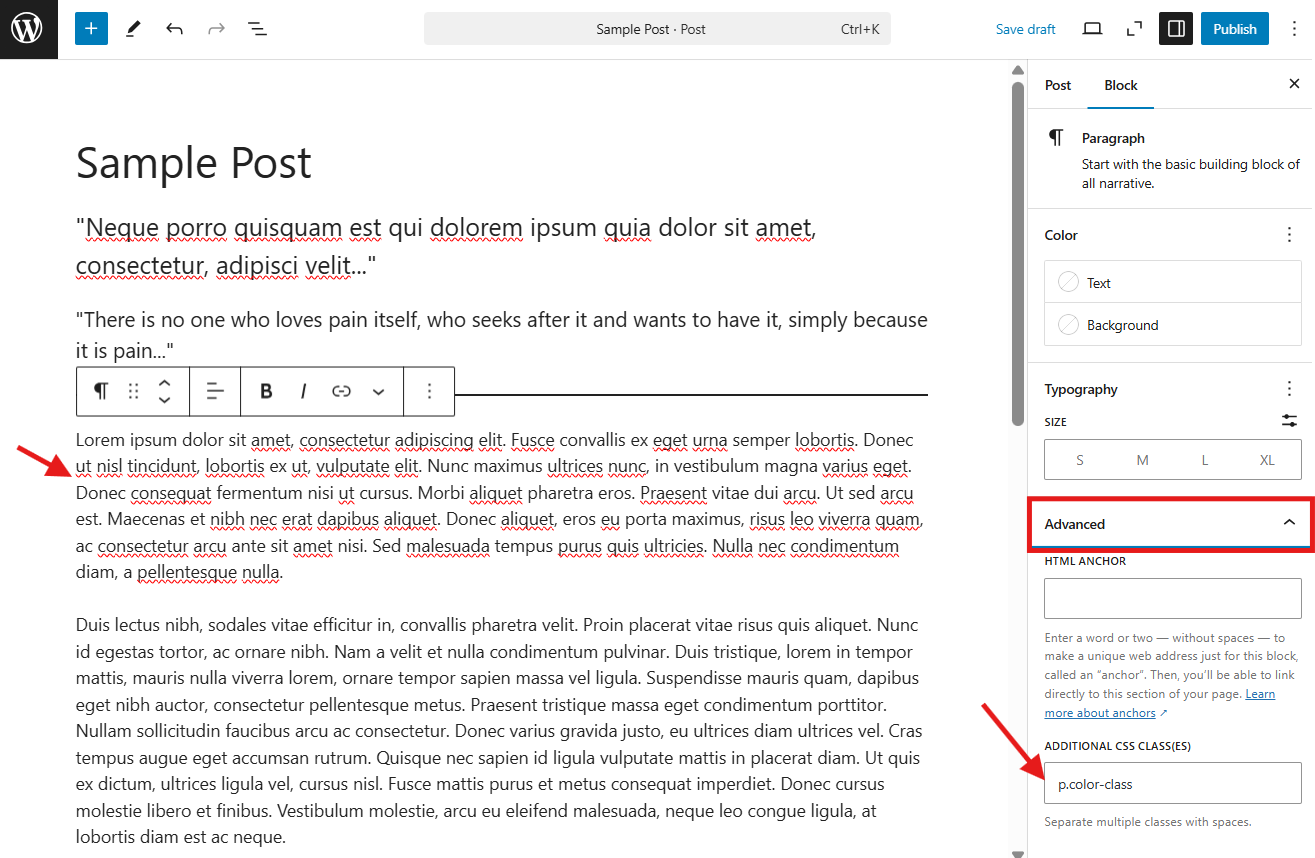
Your new CSS class is now ready to use in the block editor! Let’s apply the new CSS style to a text block using the Site Editor. Follow these steps:
- In your WordPress dashboard, navigate to Posts > All Posts.
- Hover over the post you want to edit and click Edit.
- Select the block you want to modify—such as a paragraph.
- Go to Block Settings> Advanced > Additional CSS Class(es) in the sidebar.
- If you don’t see this menu, click the Settings button in the top-right corner next to the three-dot icon.
- Enter your CSS class and click Save.
To add multiple CSS classes, separate them with spaces. To remove the styling, delete the corresponding code from the style.css file.
Best Practices for Adding Custom CSS
To ensure your CSS changes are effective, maintainable, and do not negatively impact your website’s performance, follow these best practices:
1. Use Specific Selectors to Avoid Conflicts
Avoid using overly broad selectors that might unintentionally modify multiple elements across your website. Instead, be as specific as possible to ensure your styles apply only to the intended elements.
✅ Good Example:
.article-content p {
  color: #333;
  font-size: 16px;
}
🚫 Bad Example:
p {
  color: #333;
}
The first example ensures only paragraphs inside elements with the .article-content class are affected, reducing the chance of unintended style changes elsewhere
2. Use Browser Developer Tools for Testing
Before applying changes, test your CSS using browser developer tools. This allows you to experiment with styles in real-time without permanently modifying your site.
- In Chrome, right-click on an element and select Inspect.
- In Firefox, use Inspect Element.
Edit styles directly in the developer console to see immediate effects before applying them in your CSS file.
3. Ensure Mobile Responsiveness
Make sure your custom CSS adapts to different screen sizes by using media queries.
✅ Example:
@media (max-width: 768px) {
 .sidebar {
    display: none; /* Hide sidebar on smaller screens */
  }
}
4. Test on Multiple Browsers and Devices
Different browsers interpret CSS slightly differently. Always test your site’s styling on:
- Google Chrome
- Mozilla Firefox
- Safari
- Microsoft Edge
Additionally, check responsiveness on various devices, including tablets and smartphones.
5. Backup Before Making Major Changes
Before implementing extensive CSS modifications, always back up your website or at least copy your current CSS into a separate file. This ensures you can quickly revert if something goes wrong.
6. Keep Your CSS Organized and Readable
Well-structured and properly commented CSS improves readability and makes future modifications easier. Organize your CSS using sections and comments.
✅ Example:
/* Header Styles */
.header {
  background-color: #f8f9fa;
  padding: 20px;
}
/* Navigation Menu */
.navbar {
  background-color: #333;
  color: white;
}
This structure makes it easier to navigate through your CSS when making updates.
For better performance, use shorthand properties where possible:
✅ Optimized Example:
margin: 10px 20px 10px 20px; /* Shorthand for margin-top, right, bottom, left */🚫 Unoptimized Example:
margin-top: 10px;
margin-right: 20px;
margin-bottom: 10px;
margin-left: 20px;
7. Minify and Optimize Your CSS
Optimizing your CSS is essential for improving your website’s loading speed and overall performance. Large or unnecessary CSS files can slow down page rendering, leading to a poor user experience. To keep your site running efficiently, minimize your CSS by removing unused styles and redundant code.
One effective way to do this is by using CSS minification tools, which compress your stylesheets by eliminating unnecessary characters like spaces and comments without affecting functionality.
8. Use a Child Theme for Permanent Customizations
If you’re making CSS changes to a WordPress theme, always use a child theme instead of editing the parent theme directly. A child theme allows you to modify the design without losing your changes when the parent theme updates.
Final Thoughts
If you want to tweak your WordPress site’s design, adding custom CSS code is a great way to enhance its look and improve the user experience. You have a few options depending on your comfort level:
- WordPress Customizer: Best for quick, minor changes.
- Child Theme: Ideal for larger customizations while keeping your main theme intact.
- Plugins: A hassle-free option, especially if you’re not a developer.
By picking the right method and following best practices, you can customize your site smoothly without affecting future updates or performance!