If you’re running a WooCommerce store, setting up shipping correctly can make or break your customer experience. Whether you’re selling locally or globally, the way you handle shipping in WooCommerce affects pricing, delivery speed, and trust.
In this guide, we’ll walk you through how to set up shipping zones, methods, and rates in WooCommerce. We’ll keep it simple, clear, and actionable so you can get back to selling with confidence.
Shipping may not be the most glamorous part of running an online store, but it’s one of the most essential. Without a solid shipping system, you risk confusing customers, overcharging them, or worse, losing sales.

The good news? WooCommerce gives you all the tools you need to create a smart and flexible shipping setup. Also learn, How to Hide Related Products for a Specific Category in WooCommerce and Fine-tune your product pages your way.
Table of Contents
Understanding WooCommerce Shipping Options
Before you start clicking around the shipping settings, it’s helpful to know how WooCommerce shipping is structured. The platform is designed to be both flexible and beginner-friendly, offering a wide range of tools for simple or complex setups.
At the heart of shipping in WooCommerce are three main components:
📦 Shipping Zones
These are specific geographic areas where your store offers shipping. You can define zones by countries, states, or even postal codes. Each zone can have its own unique shipping rules.
📦 Shipping Methods
These are the types of delivery options available to customers within each shipping zone. Out of the box, WooCommerce offers three default methods: flat rate shipping, free shipping, and local pickup. Each of these methods can be tailored to match your store’s strategy.
📦 Shipping Rates
These are the actual prices your customers pay for shipping. Depending on the method, these can be static or dynamic, and WooCommerce lets you create custom rate structures using formulas or classes.
For store owners, this layered approach means you can start simple and grow more advanced as your store scales. Whether you’re shipping T-shirts locally or handmade furniture across the country, the WooCommerce shipping setup can adapt to your needs.
How to Add Shipping Zones?
The first thing you need to configure in your WooCommerce shipping setup is the shipping zones. Think of zones as the where in your shipping logic. This tells WooCommerce which locations you’ll ship to and what options will be available to those areas.
For example, you might want to offer free shipping in your local area, flat rate shipping for national orders, and exclude shipping altogether for regions you don’t serve. That’s exactly what shipping zones are for.
Step-by-Step: Adding Shipping Zones
- Go to your WordPress dashboard.
- Navigate to WooCommerce > Settings > Shipping.
- Click Add shipping zone.
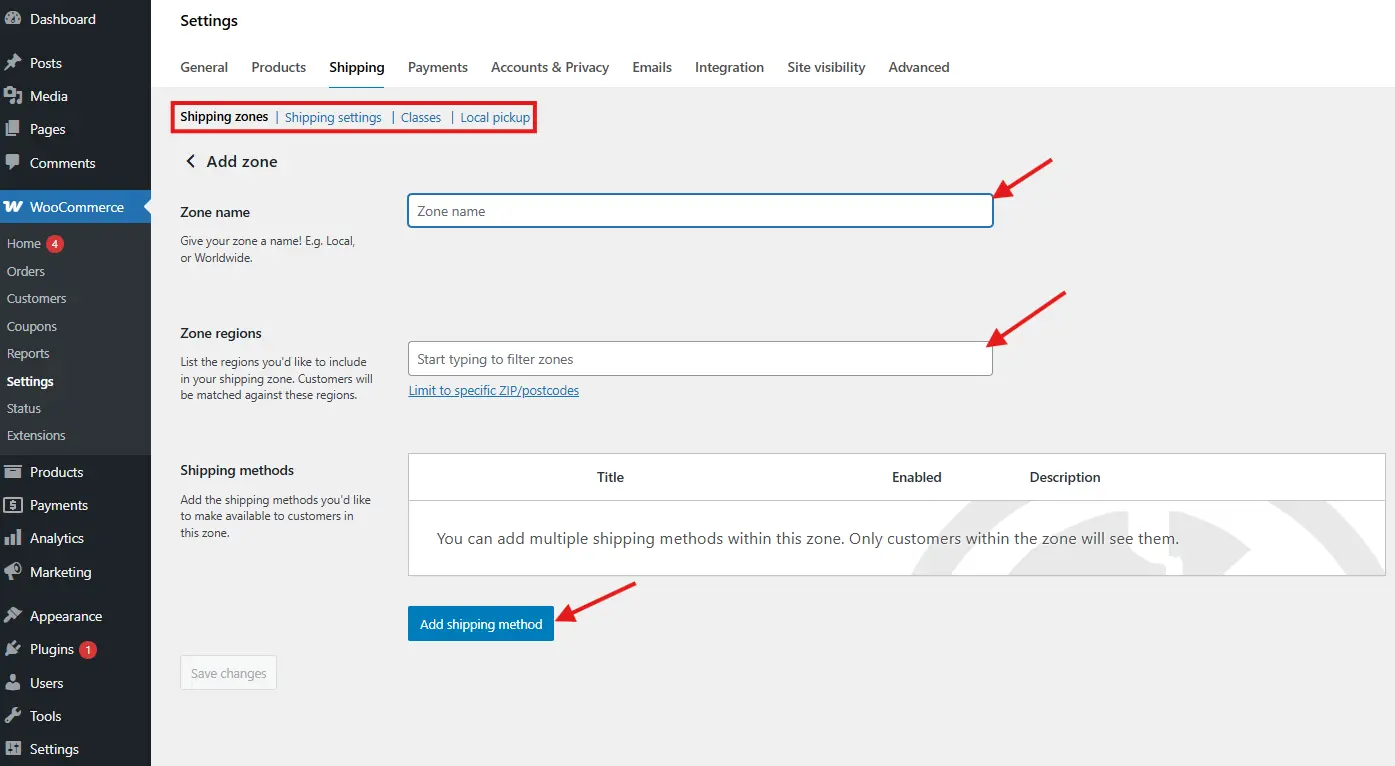
- Give your zone a name. This is for internal use only, so pick something descriptive like “USA,” “California,” or “Europe.”
- Select the countries, states, or postal codes that apply to this zone.
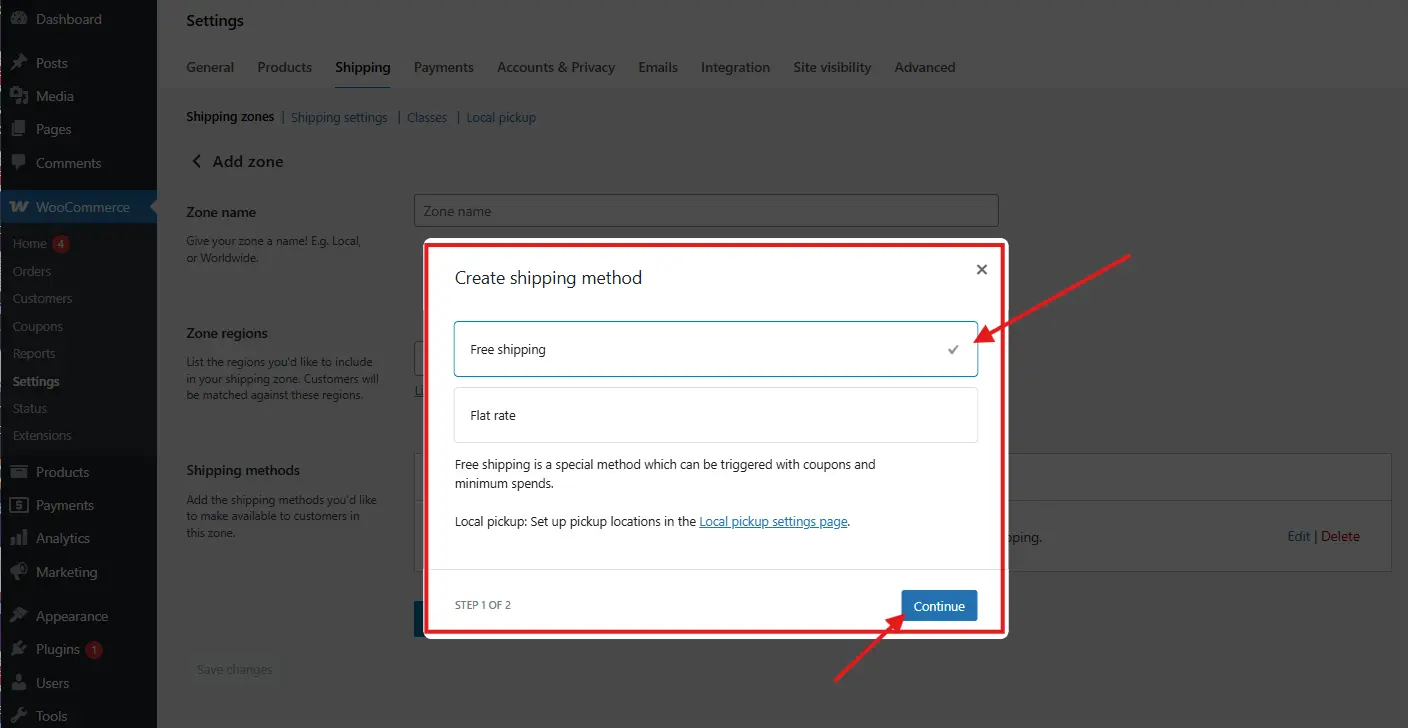
- Click Add shipping method to set how products will be shipped in this zone.
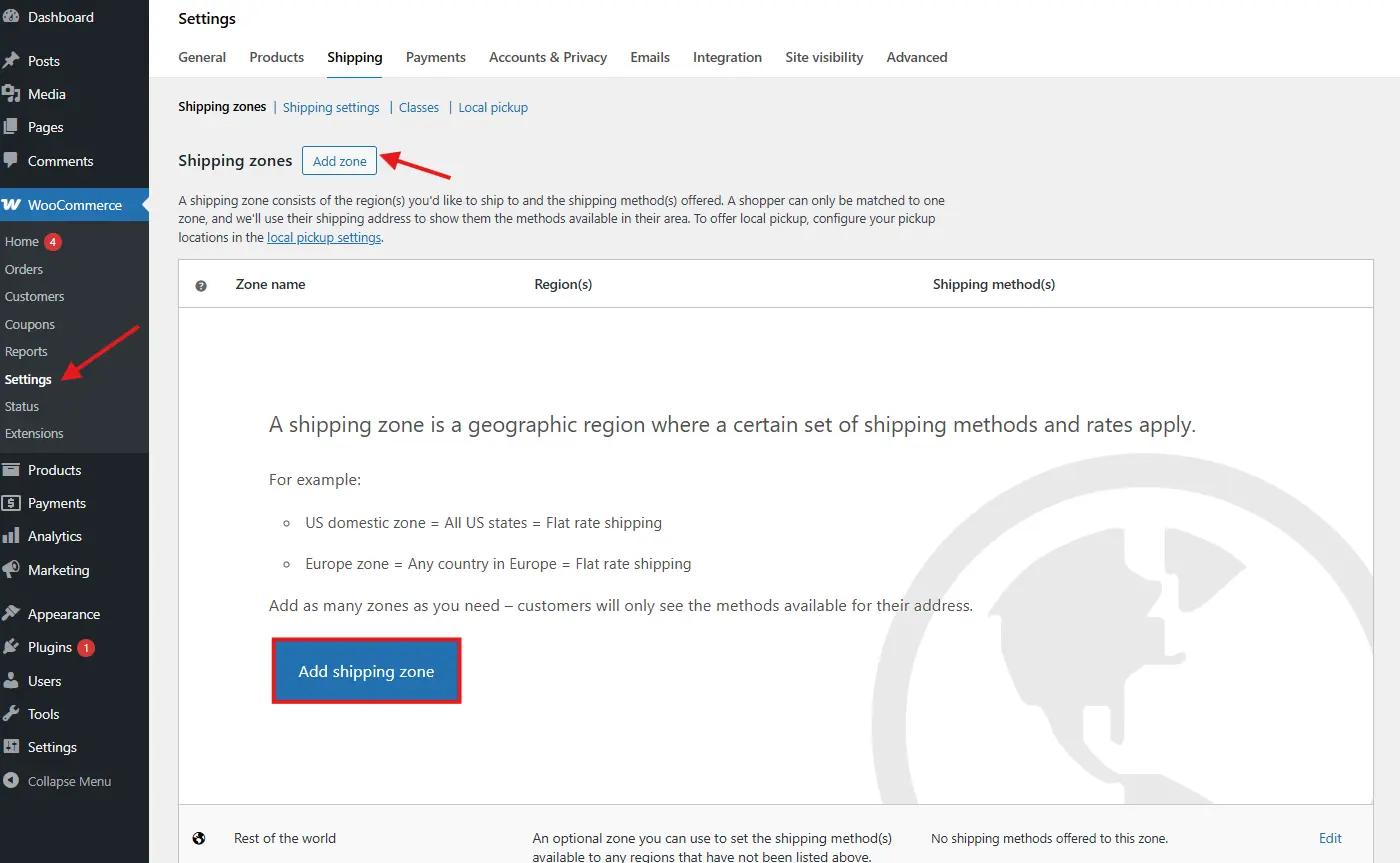
You can add as many zones as needed. The order of zones matters too, WooCommerce checks the list from top to bottom and applies the first matching zone.
If a customer’s address doesn’t match any of your custom zones, WooCommerce will use the default “Rest of the World” zone. So always make sure to add one, even if you just want to disable shipping in certain areas.
Pro Tip: You can use postal codes to get really specific, which is great for local delivery or pickup options.
Adding Shipping Methods
Once you’ve created shipping zones, you need to assign shipping methods to each one. This is the how of shipping in WooCommerce. It tells the system what kind of delivery services you’re offering to customers in that zone.
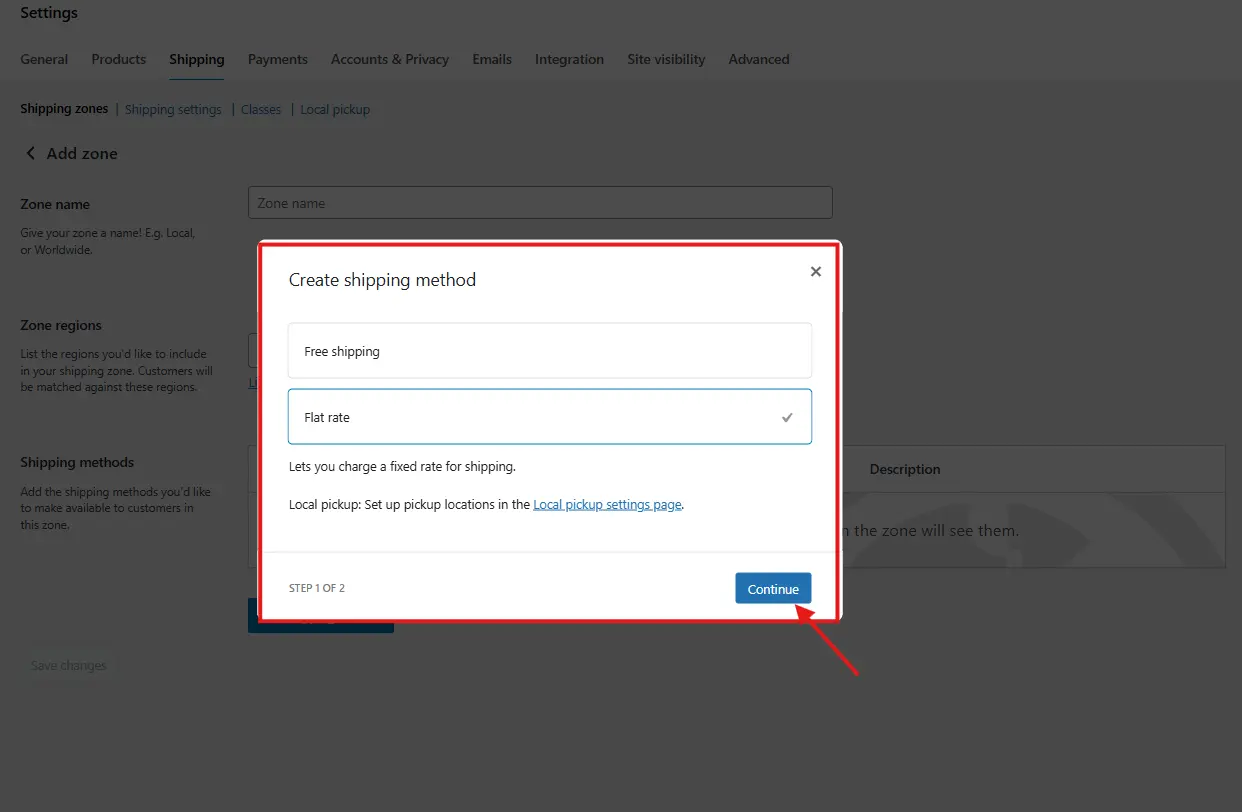
WooCommerce offers three built-in shipping methods:
1. Flat Rate Shipping
This method lets you charge a fixed price for shipping, regardless of the cart’s size or weight. It’s a favorite among online store owners for its simplicity. For example, you can charge $5 shipping for all orders, or set a $10 shipping cost per item.
Flat rate shipping in WooCommerce is also flexible enough to be extended with shipping classes or custom cost formulas.
2. Free Shipping
Everyone loves free shipping, and WooCommerce makes it easy to offer. You can set conditions for free shipping like a minimum cart total, a coupon code, or specific products in the cart.
Using WooCommerce free shipping as a reward for spending more can be a powerful sales incentive. For example, “Free shipping on orders over $50” encourages customers to buy more.

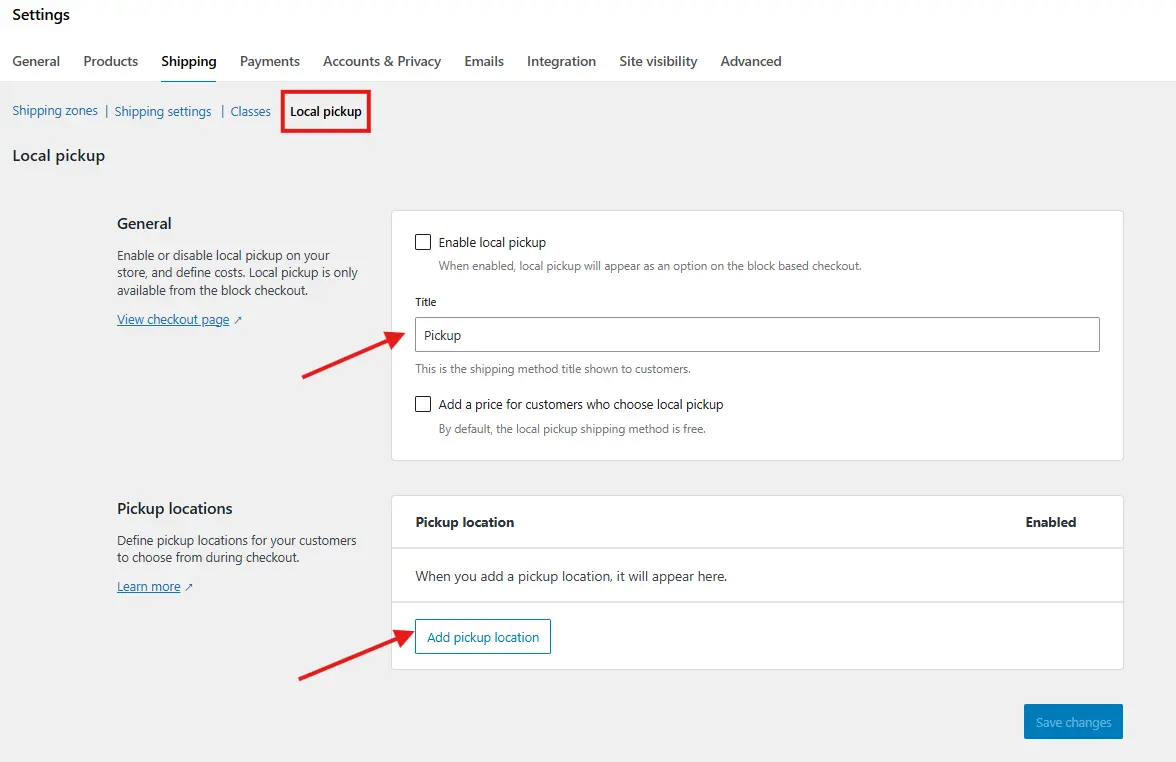
3. Local Pickup
If you have a physical store or offer curbside pickup, this method lets customers skip shipping altogether and collect their orders in person. You can even add a small fee to cover packing or handling.
How to Add Methods to Zones:
- Navigate to WooCommerce > Settings > Shipping > [Your Zone].
- Click Add shipping method.
- Select your preferred method (flat rate, free shipping, or local pickup).
- Click Edit to configure it.
You can mix and match these methods in each zone. For example, you can offer free shipping and local pickup in one area, and only flat rate in another. The WooCommerce shipping setup allows for this kind of customization without needing code.
Configuring Shipping Rates
Now that you’ve added shipping methods, it’s time to customize the shipping rates your customers will pay. This part of the WooCommerce shipping setup lets you control your pricing structure in a way that matches your costs and strategy.
Let’s take a closer look at how to fine-tune each method.
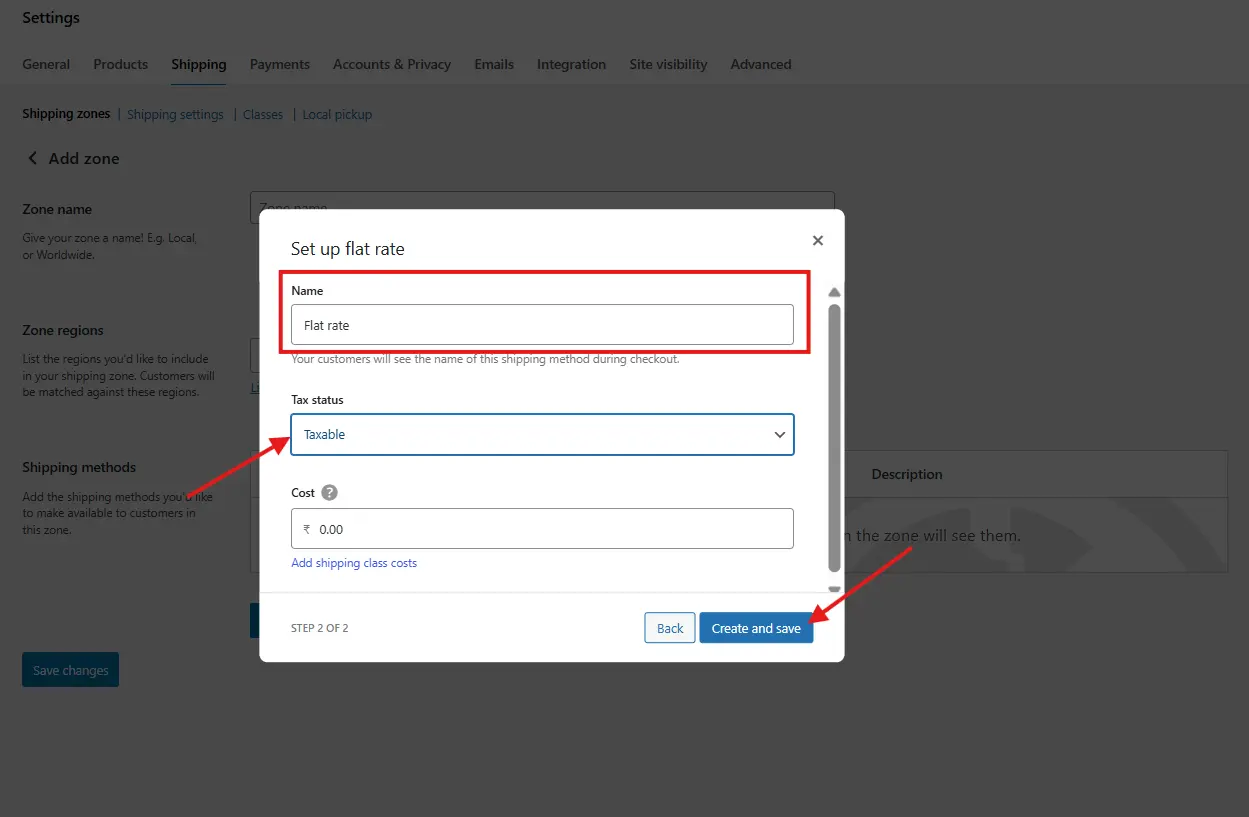
💲 Flat Rate Shipping WooCommerce
When you use flat rate shipping in WooCommerce, you can charge:
- A fixed rate per order (e.g., $10 flat)
- A rate per item in the cart (e.g., $3 per item)
- A rate based on shipping class
You can also enter formulas to make rates more dynamic. Here are a few examples:
10= $10 flat rate5 + (2 * [qty])= $5 base plus $2 per item20 + [fee percent="10" min_fee="2"]= $20 base plus 10% of cart total
This flexibility means you can cover costs without scaring away customers.
💲 WooCommerce Free Shipping Rules
When using WooCommerce free shipping, you can set conditions like:
- Minimum order total (e.g., free shipping for orders over $50)
- Coupon code required
- Specific user roles or locations
This is ideal for rewarding loyal customers or encouraging bigger purchases.
To configure free shipping:
- Click Edit next to the Free Shipping method in your zone.
- Choose the Free shipping requires… option.
- Select your condition (coupon, minimum amount, or both).
- Save changes.
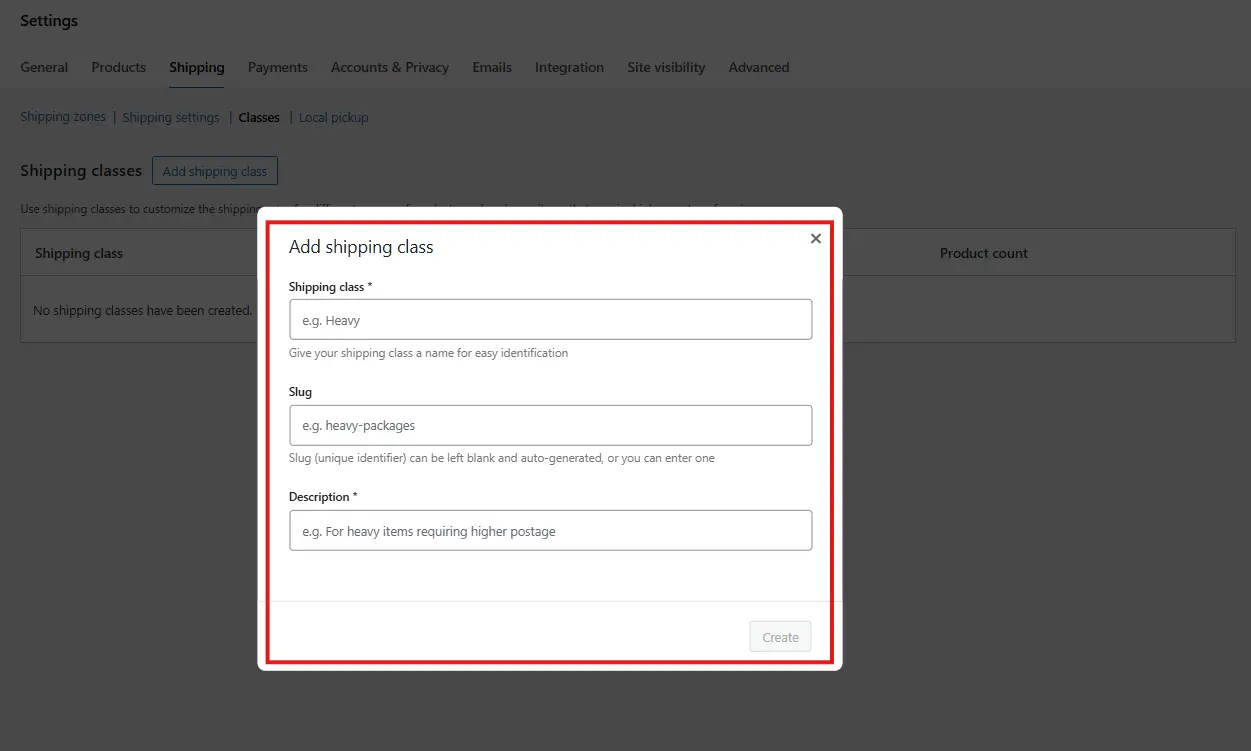
💲 Using Shipping Classes for More Control
Shipping classes help you group similar products. For example, you might want heavier items to cost more to ship.
How to set it up:
- Go to WooCommerce > Settings > Shipping > Shipping Classes.
- Add a new class like “Heavy” or “Posters.”
- Assign products to these classes in their product settings.
- Return to your flat rate method and set different prices per class.
By using shipping classes, you can offer custom rates for different types of products without needing external tools.
Testing Your Shipping Setup 📡
Now that everything’s configured, it’s time to make sure it works.
How to test:
- Add products to your cart and proceed to checkout.
- Use different addresses to test different shipping zones.
- Make sure the correct methods and rates appear.
Don’t forget to test:
- Free shipping thresholds
- Tax settings on shipping
- Mobile experience
You can also use staging environments like InstaWP to test changes without affecting your live store.
Common Mistakes to Avoid 🔎
Setting up shipping in WooCommerce can get tricky if you’re not careful. Here are some common pitfalls to watch out for:
- No fallback zone: Always create a “Rest of the World” zone to handle unassigned customers.
- Method overlap: Ensure your zones don’t conflict with each other.
- Wrong address format: If a customer’s region doesn’t match your zone settings, they might not see any shipping options.
- Flat rate confusion: Be mindful of whether your charges are per order, per item, or per class.
Take your time and double-check every step. A small error in setup can lead to abandoned carts.
Tips for Advanced Shipping Needs
Want more power and flexibility in your shipping setup? Try these:
💡 Use Shipping Plugins
- Table Rate Shipping for WooCommerce: Great for complex rules like “$5 shipping for 1–5 items, $10 for 6–10.”
- WooCommerce Conditional Shipping and Payments: Restrict shipping methods based on user role or cart content.
- Zone-Based Shipping: Calculate costs based on location, weight, or dimensions.
💡 Integrate with Carriers
For real-time shipping rates from USPS, UPS, FedEx, or DHL, install their official WooCommerce extensions.
💡 Offer Local Delivery
If you deliver within a city or region, set up flat rate or free shipping based on zip codes.
You can even combine plugins to create conditional free shipping, like “Free shipping for orders over $50 within California only.”
Conclusion
Shipping is more than just a checkout feature, it’s a key part of your customer experience and conversion strategy. With WooCommerce, you have everything you need to create a flexible, easy-to-use shipping system tailored to your business.
Start with the basics: define your shipping zones in WooCommerce, add flat rate or free shipping methods, and test your rates. Then layer in complexity using shipping classes or plugins when you’re ready.
Whether you’re offering flat rate shipping in WooCommerce for simplicity or advanced zone-based pricing, getting your WooCommerce shipping setup right means happier customers and smoother operations.
Want to Keep Building a Smarter WooCommerce Store? Don’t stop here. Check out more WooCommerce guides from Tutsflow to keep your store running like a well-oiled machine:
- How to Set Up Taxes in WooCommerce (Quick 4 Step Guide)
- Best Plugins to Manage WooCommerce Store Hours: 2025 Edition
- How to Schedule Store Hours in WooCommerce with Open Close Plugin (5 Easy Steps)
- Custom Add to Cart Links in WooCommerce: Easy 3-Step Guide
- How to Temporarily Disable Your WooCommerce Store (Without Breaking It)
- WooCommerce Multisite Setup: Manage Multiple Stores from One Dashboard